Mastodon

16.5.18

Session XIX

Finishing up the base paintjob

I took some time to fix up the pieces, which kind of rounded out the second 45-min session so that despite what the posts claim, there was one more session but this made the time calculation easier. Anyway, I finished up the painting of the turrets and then I touched up some bits that had been shadowed.

Then I loaded up my airbrush with a bit of black paint and I sprayed that with a wide arc, from a decent distance, towards the rear deck, especially the engine's fan cover and the exhaust bits. Of course that made these areas stand out way too much, so I applied a fresh layer of Russian Green on top of all this to tone it down a bit. It ended up way better this way.


2.5.18

Session XVIII

Starting up

I began the painting by airbrushing the tracks and their immediate surroundings black (VMA 71057 Black) and the bottom of the hull and the side armour plates green (VMA 71017 Russian Green 4BO). Despite the small amount of stuff I did it took a surprisingly long time to get it all done. Maybe I was a bit rusty since it'd been ages since my last airbrushings.


The next evening I continued with the tank's deck and I also painted the first halves of the turrets (somehow I had forgotten them completely the previous evening). When the whole tank was decently greenified I took some light brown paint (VMA 71136 IJA Earth Brown) and sprayed it a bit on the deck, much more on the bottom areas, especially concentrating on the roadwheelery. I tried to get as believeable a light layer of crap I could manage.


The turrets looked pretty comical now that they were painted only from the bottom. I obviously wasn't going to leave them like that, so it was fine that they stood out like this in the wip pics.


18.4.18

Session XVII

A priming process in two acts

First

As usual, I blasted the primer on the model in two subsessions. I chose my starting side so that I'd have the most coverage. To achieve that I thought that the bottom part of the tank would be good, and as for the turrets I decided to prime the tops first. Naturally I forgot the cable wheel totally and that was the bit I intended to start with.


Second

When I was done I left the bits to dry overnight and to my great surprise continued my priming the next evening. This time I started with the cable wheel, then finished up coating the turrets and finally the tank itself with the most weird bits and shapes. The side armour plates on the tank weren't up to my made-up requirements, so I gave them another layer of primer.


To wrap this session up I present a top-down image - and to break up the monotony of my photography a bit. That gave a pretty wintery feeling. Now it'll be nice to get back to the basic green painting.


4.4.18

Session XVI

Straightening up

A part of the armoured plates were grinning uglily, so I wanted to take care of them before proceeding. I didn't try anything more complicated than applying glue and squeezing the bits tightly together. Most of the bits got fixed, but I wasn't left with perfection, anyway.


A coin for scale, again

PuTTY

The rest of the gaps I was going to fill up with putty. But what did I find when I finally sat down and started unscrewing the cap? I immediately got a flashback (to last or even the previous year, maybe) when I touched the cap: I had only left it just a bit closed, so that it wouldn't dry up while I was applying the goo on something.

Apparently what I had used had been enough and I hadn't realized that it was still openish. All that remained was stuck inside the tube and utterly useless. Sigh.

So I went by the LHS on my way from work the next day and bought a new tube. I didn't care about the brand, so I picked up the first one I saw. The one I had earlier was Tamiya's, this was something called Mr. White Putty. It was a bit runnier than the thickish old one was, based on one trial run.


Sanding it all down

Erring on the side of caution I allowed the stuff to dry overnight and sanded the excesses off the next evening, resorting to a file in the more annoying corners. The left front of the tank looked a bit off, but that was caused by the extra gluing, not by putty that didn't feel like obeying abrasive behaviour.


I'd be priming this beast the next time(s)! On the seventeeth round, which'd be a questionable record even for me.

21.3.18

Session XV

The final construction post

This is the last post about the building part, trust me. I think I'll keep the same naming up until this is all done.
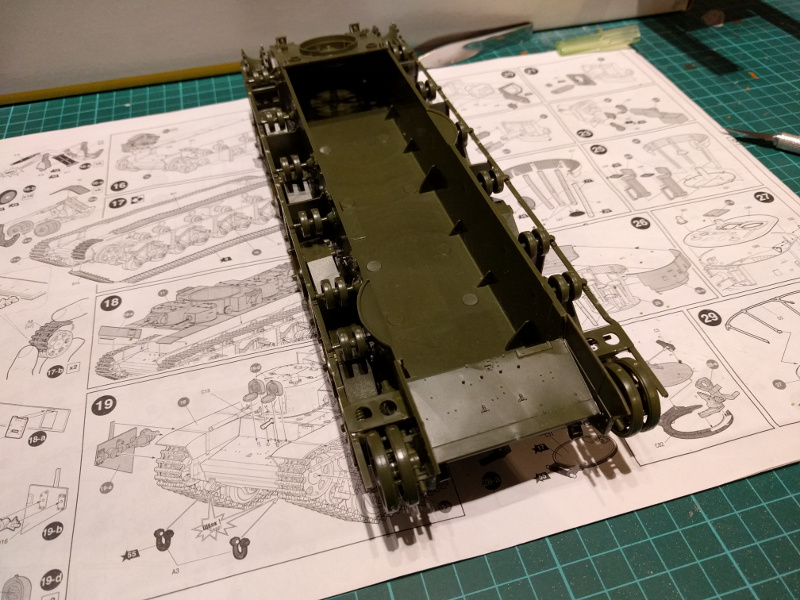
Side armour plates

To begin the end of this, I started by cutting off the left side's armour skirt pieces and cleaning them up from excess crap. Then I simply glued them on to the support structure, starting from the front.

No major problems occurred, other than that the armour skirts didn't just reach the deck armour at all. I did complain earlier that there were fitting issues between the deck and the tub. Here those just glared at you, as the top attatchment points of the plates didn't hit. Looking a bit further away (image 2) it didn't look too bad, but still.


The other half of the tank went just as quickly, with the same issues. I'd have to use a full session at least to putty and whoknowhowelse to fix these random things. That was going to be a post on its own, I didn't want to mix that stuff here this time.


The cable roll

My last missing piece was the cable roll, that was going to be installed to the left side of the turret cluster. I just superglued one end of the thread to the core and left it hanging. My idea was that I'd paint the roll separately and only after that and the tank were painted, I'd roll up the thread, superglue a bit near the end, cut the excess away and then glue the setup on the deck. There was enough thread for a couple of these, based on a very quick test.

The point of doing this in this order was that it wouldn't matter if and when the thread got painted on, as the ruined part of it would be hidden in the center of the roll. And the outer side would be weathered just like everthing else. As the thread's colour was just fine in my opinion, I wasn't going to paint it at all.


Schedule mumblings

At this point, when all the actual building was done and the hours locked in, I thought I'd ponder a bit on the numbers. So, I had 14 * 45 mins + this post's fifteen minutes (amazingly quick, I know!) clocked. That totaled in at 645 mins, that then turned into a slightly prettier form: 10h 45min.

Interesting, I'd say, especially as a number of earlier projects, where I've been marking down my hours (in a different way, but still) have been completely finished with these numbers. Those have all had a pretty small percentage spent on the actual building out of the whole project.

Where did all this time go, then? As we all know, a context switch is an expensive operation, and this is what has been going on a lot: 15 times starting up + doing something + wrapping up. So there's been a lot of repetition and sort of "extra" time. But a big reason for my suboptimal time usage was that my hobbying environment has changed quite a lot from what they were, say, a year ago. These 45min sessions have not been exactly full of 100% concentration, but that's life for you :)

I guess that if all my modeling projects were done in an NTP environment, they could be compared plausibly, but the real world has never behaved that way. Different models, makers and who knew what other variables were in play, all those have affected the time spent in each stage in curiously varied ways. I really wasn't going to build a dozen different versions of the same model just to get some data on this, so... yeah, this was a long build while others haven't been :p

7.3.18

Session XIV

Finalizing the main turret

Apparently I was so taken by the Joy of paint... I mean building, that I had completely forgotten to take more work in progress photos. Most of my time with the turret was eaten by cleaning up the cursed pieces, especially the flimsy antenna. I really had to be cautious with it and I guess I was half-paranoid, because I felt it was about to break either by bending or the knife. It didn't, but I guess I'd fixed it with a section (as many as necessary) of metal wire.

What was missing from the main turret was the "roof" with the commander's hatch and a few tiny bits. And that antenna, that I was just complaining about, it had to be attached somehow from a few, tiny points. I have to admit that I was pretty sceptical, but to my great surprise it didn't break, hadn't been malformed or mismeasured, but got attached just perfectly.


Almost done!

At this point of the text I'll say that because I had three photos, and especially as I had left the documenting part on hold, I really couldn't remember what I had done and how long anything had taken, because there was some time between these things. All I knew was that I had used up all my time for the session because I clearly remember lamenting that the building phase had to be extended one more session so that I'd get the armoured skirts on.

I guess I had had a good amount of details to be taken care of, because I just cannot believe that the turret's last few things had taken so long. No matter, the tank was almost built! Of course I could have  just left it as is and declared how it was what I'd planned all along. But that'd been a blatant lie, so maybe next time I get to say: we're done?


21.2.18

Session XIII

The main turret

After the tracks were done I finally got to work on the main turret. The construction order in the instructions was again somewhat curious, first I was to build the shell of the turret, then to proceed to assembling the gun itself.

There were a good amount of details in the gun itself, especially if one was to build the model with (at least) the main turret's hatches open. Or, if one felt brave enough, to paint the insides and keep the turret off the tank itself. I really didn't think I'd go for that, so most likely this was just going to be just my own sick ponderings (if someone reading this got inspired, goody).

The tank's main gun (a 76.2mm M27/32 (3" according to the converter)) looked fun and was a multiphase build. Technically that (and many other things in T-35) it was a bad idea, I've understood, but then again, many tank weapons were suboptimal during the early war years. I guess they got something broken with that gun in real life, but according to wikipedia the gun was replaced with a slightly better gun.


Workspacelessness

Now I couldn't remember if any of the tanks I'd built so far had a turret's details modeled this far. A typical turret had a couple of foldable bench-plates at best and that's been it. Here we had a proper-looking support structure and all :o These aforementioned beams were a pain in the donkey, as getting the top ring, the baseplate and these things aligned and cured properly wasn't that quick and easy. Some light and gentle swearing was required. In the end it all was just pretty good and I was quite content with it.


Turret assemblage

Gluing the heavyish gun-containing turret part onto the previous subassembly was hair-greying. Because of the mass differences I didn't even consider building it updright and then doing it upside down was still a bit complicated, as the baseplate was still heavy enough to bring some exta torsion to the show. Still, even this ended up being just fine.

The last "Emma" LMG was installed into this turret, of course. I wanted to glue it at a bit of an angle, to prevent all the spikes of this hedgehog from pointing into the same direction. Some gentle variety, you know?


All in all this was damn time consuming, as my three quarters were done and I felt like I had gotten nothing done. When packing stuff up I tried out the turret and then saw that hey, there was visible progress again.


7.2.18

Session XII

The pleasant rattle of the caterpillar tracks

When I returned back to my table I could take a step back and return to the track building parts I had skipped earlier. I wasn't really excited about this as they consisted of a bunch of long and short strips, and those have always been somewhat inconvenient to assemble. The instructions always have come with a "use so-and-so many bits and it'll be good" count and that has never been exact but they've always been "not close enough". So, having no better idea, I followed to guidelines and prepared a suggested amount of pieces per track.


The first track (for the left side) got assembled rather painlessly, even if I had to remove one individual link from the front end, because why in the Empire would the instructions and the reality agree on anything? Not that it was perfect even with that one extra link removed, there still was a bit of slack, but that was most likely because of the shaped top piece being slightly imperfectly set.


Next track went much quicker, which has always been the case: the first one taught me how the next one was to be done. This time I got the track aligned properly and as I had dropped off that one link before assembling, it was just the right size. Hooray!


Joining the main hull parts

I allowed the monstrosity to rest on its tracks for a bit, meanwhile I cleaned up the driver's vertical armour plate for installation. No matter how much I dry-fitted the armoured deck plate on the bottom hull, it didn't end up well-aligned at all, especially the rear of the tank. There'd be fixing later on, in the photo you could see the liquid glue bottle as a quick "hold it down, will ya?" solution. Again I left the side cutters and my hobby knife in the photo for scale.


24.1.18

Session XI

The bogie factory wraps it up

All that my octet of bogies was missing was a pair of pieces per component. The smaller and potentially less easily distinguishable was the bit that locked the bogie on the the axle. Then the second one, pretty clearly, was that cabin roof piece that was, I guessed, protecting the springs from pinecones falling from the trees or something like that.


After a pretty short glue-curing break I decided to install the whole set onto the lower hull at once. The first ones per side felt a bit flimsy, but as soon as all eight were on, the monster felt much more stable. I left it standing on its paws to get all the pieces to cure in a nicely straight and even position.


On the takeover lane

At this point the instructions were urging me to install the tracks, but as the roadwheelery was still curing, I didn't think it made any sense. So I jumped to the next implementable step, which happened to be the main turret's gun and its friends.

Hunting the pieces down took ages again, but at least these were much less cleanup-intensive than the previous bits. During my final session minutes I got some howitzer's read end pieces done and both turret seat setups. The ergonomy of said seats looked terrifying, but perhaps the crews weren't expected to survive long enough to develop any back issues.


10.1.18

Session X

Hell is pieces

I finally got to a new page of the instructions and for the first step I was told to preassemble eight components 16-A, which happened to be the road wheel unit. A bit like those things (VVSS bogies) on an M4 Sherman, among other tanks.

Fifteen minutes later I had got half of the bogie pieces and all the springs cut off and somehow cleaned up.


After the next generous fifteen minutes I had gotten all the pieces I needed now done and ready to be installed. At this point I was already in the "well, I have to quit and pack up in a few minutes" mood, see my ~45min session time.


Still, I began my expectedly short actual building stint to see what I could achieve. I started with the quickest and most easily mass-produced bits, the road wheels (x16).


Next I rapidly glued all the springs into the bogies and after those I installed the central bits. According to the instructions the springs should've connected with a loud snap - but no, I heard nothing, needed no special force as they settled in peacefully for me.


So, I managed surprisingly far in a bit more than ten minutes, when I finally got to begin the assembling. I did try some dry-fitting of the outside bit of the bogies, but I didn't feel like fighting with them in a rush and less than optimal amount of care.


Painting all this would be joyful... However long it takes to get there.