Mastodon

30.11.22

More car manufacturing

This year's second Lego car

The construction process started, again, from a halfway colourful Technic frame. Pretty quickly it became clear where the main important bits were going to live in, such as the wheel rotator setup.


Some of these following photos showed, if you stared at them carefully, that I had started building the wheel rotators wrong. I noticed it only when I was testing the rotation and the L-shapes didn't align as I expected them to, and they wanted to turn to the wrong direction from the flight mode. When I noticed it I fixed it but made no specific mark when I took my photos.


After the wheel setup was built, the car's exterior started going forward in leaps and bounds. The lower front was surprisingly complex in its shape.


In addition to the chromed strips the wheel wells and the nose's edges brought the familiar look up. The Time Machine was such a child of the eighties, that this was the only conceivable look for it.


The car's rear deck was pretty modular-looking at this point. Would've been cool if you could just swap in/out the different movie versions, but alas, it was not going to be (I had spoiled myself already by checking the I/II/III variants earlier).

The rear lights were just damn cool. In an eighties way, that is.


Slowly but steadily the car's outer edges got built. All the primary colours disappeared under layers of black, grey and silver/chrome.


Finally it was time to add some interior details. Here we just had the handbrake, the dashboard base and the switch for the time circuit.

The light brick went there, and it got a TNT-plunger -like press-switch, but at this point I couldn't imagine what and how it was going to behave in the final model.


Flux Capacitor, the

It wasn't that long since I last saw the first two BttF flicks, but I could hear the sound effects as if they were on tv as I was building! Of course there wasn't a perfect lit transparent three-pronged Lego piece but the grappling hook was a great part for this model.


*giggling*

The segment LED displays - those that showed the destination time (red), current time (green), and the last time departed (yellow) - were pretty neat. I kinda expected them to be printed, instead of having to misalign stickers badly. But that's how it was, I just didn't like stickers myself, so I grumbled a bit. The important thing was that it looked fantastic.

Not much leg space between the seat edge and the steering wheel...

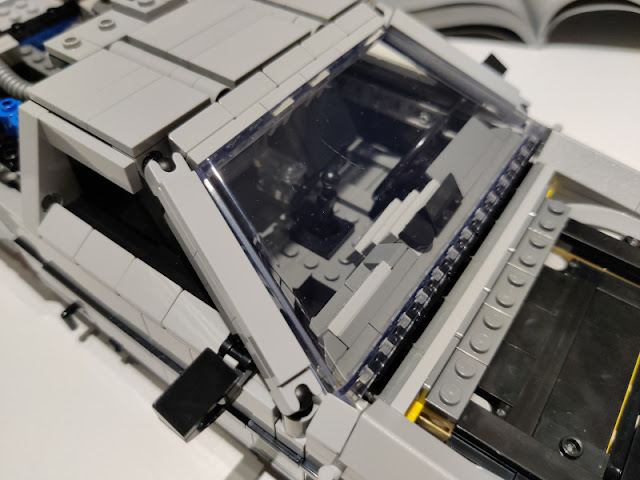
I was pretty sure I had read that the windshield was a unique piece just for this set. The shape was peculiar, so I didn't think there were awfully many other normal uses for that kind of a piece.

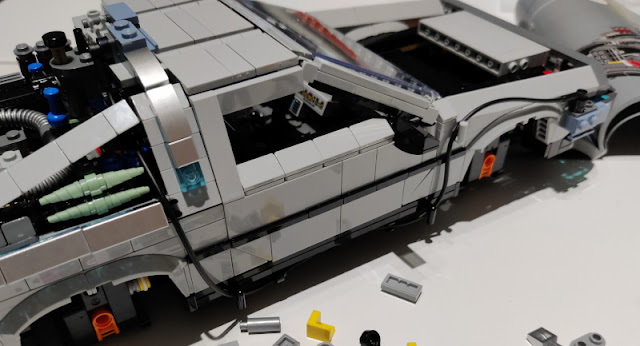
For some reason the roof and the top parts of the gull-wing doors were built now and then the build process continued to other areas of the car.

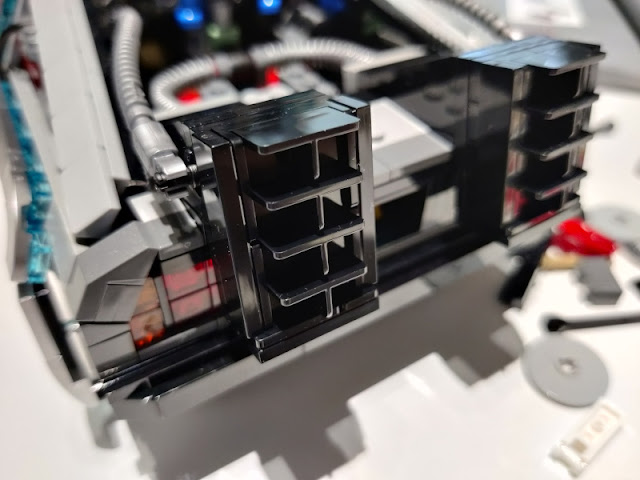
The rear of the car started getting fleshed out. Random knick-knack, attachment points for the frame and then these massive cooling funnels. Or that's what I always thought they were.


Gull-wing doors

The doors were lots of fun to build, massive and bulky as the real ones seemed to be. For the longest time it looked like they were going to be without the front edge, like in the next photos:


But the front edge got built after all, I had just expected the A-beam to be solidly by the windshield, not in the door. I imagine anything else would've been way too bulky.

Last edges and cables

These rear edges of the car were pretty tight setups, and they got clipped on to the frame quite sturdily in the end. Lots of time was spent on the translucent blues and the chrome strips. Just imagine if this was also lit up somehow!


The cables were pulled from front to back, guided by the little blocks with side hook so that they didn't get pulled by the doors.


94 Pu

The bright yellow Plutonium case that Doc Brown cheated from the Libyan terrorists was cool. It only had space for two containers, as opposed to the vastness of the Playmobil Plutonium box. Still, much better than no box at all.


It even fit nicely into the trunk with the hoverboard! At least at this point, with the trunk lid waiting for assembly in the semi-distant future.

Last bits

The back of the Time Machine got filled up with details and greeblies. At long last the cooling vents got built, again greatly kicking up the wow-factor.


Being my own self, I glued the register plate stickers so that I could flip it for an original or the 2015 version. The transparent window plate wasn't something you could actually just turn around, it had to be popped off the frame for that. Would've been too flimsy otherwise.


At this point I locked my sights to the 1985 Time Machine. It was the most nostalgic ones for me, surprise of all surprises.

These cables here weren't actually important, aside from being details, I just got so excited seeing them for the first time in decades. I had a good set of these, in various colours, back in the heyday of Classic Space.

Alternate version accessories

During the three movies some changes were made to the Time Machine. During the first one an electricity-conducting rod was added, in the end the Plutonium-powered setup was replaced by a Mr Fusion from the distant year 2015. And the 1885 version in the third flick was more steampunky.

Back to the Future Part II

I just built the Mr Fusion with its bananas and soda can contents at this point. I didn't undo the rear deck of the car to try it out yet, because I was barely done with the car itself. The other major change was the bar code - register plate in the back.


Back to the Future Part III

For the Part III car I should have reversed a few steps and undone the hood, so the box could be bolted on. Didn't feel like it right after finishing the build. Just like I didn't swap the wheel rims just for that at this point.

Almost all the pieces were there, when I built the box to see how it looked like. Just a couple of silly bits were not duplicated, so if I wanted to get it completely done, I would've needed to take them off the original or Part II setups.


9.11.22

Project VI/22

A time machine in a DeLorean

This Spring we took a long weekend abroad, and the target location happened to have a Lego store. Of course we visited the thing as soon as we saw it, on the first afternoon. I exclaimed out loud "hey these have a dozen time machines here!", but I didn't grab one straight away because I didn't think we could carry it back home. My partner was confident we'd make it if we just transported the bit bags themselves. I decided that I'd fetch one before we left.
Then the thrice-cursed tourists cleaned the shelves of the LEGO 10300 sets. I swore. A lot. Once again.

Later I got hinted of a new batch arriving to Verkkokauppa.com so I placed my order. They claimed it'd be delivered at some point in the Summer. Somehow I had missed the original first batch and the lego.com store didn't look promising, either, so this was one chance.

I had almost forgotten the whole thing when I finally got a "come fetch it" message to my inbox. That was several months after I could've already happily carried a set home, but such is life.


There were some more stickers than I expected. Somehow I thought that at least the time displays (here you were, here you are, here you are going to go to) would've been printed, as well as the lid of the Plutonium box. Small details, I wasn't bothered by those, I just liked the printed ones more because I didn't have a fantastic track record for aligning stickers.


Great Scott!
 

2.11.22

Finished: Project V/22

Draconis Combine - 5. Sword of Light

Funny thing, the last time I was declaring something in this paint pattern completed, I said I should get more of them. That was over a decade ago now. Apparently I've had many things on my mind since, but it was interesting to check what I have been promising or planning over the years. And to be honest, it was a fact that there ought to be more of these lightsword units, one or two sets of four.

SL-17 Shilone


Mumblings

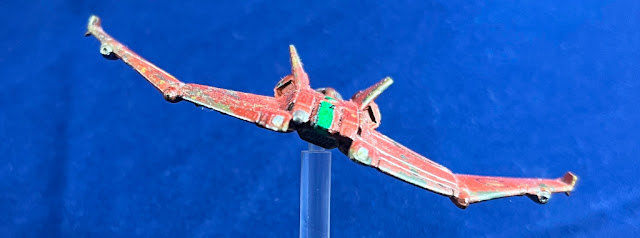
This Shilone was a fun addition to my strange BattleTech collection, but I really didn't see this one end up on the table anytime soon. Not only because the last game was almost ten years ago while the next one has been in a limbo, but because we really haven't used flying things. In addition to the basics of the Zoom & Boom method I also had no real clue of how these units were used in a 'Mech-heavy BT game.

To paint this was a nicely simple and I really liked that it had its own decent stand. The model itself was in a completely different scale than my tiny tiny Sabutais, which was a plus for the painting side of life. My engine glow effect could've end up prettier, but for that I guess I should've needed even smaller brushes. Still, I had a lot of good time and that was the key factor here.

Specs

With its 65 tons Shilone belonged to the Medium class. Used the flying devices in one singly BT game I really didn't know anything about its durability, speed, propellant, even if they were mentioned in Sarna. For what it was worth, a Shilone was good enough to incapacitate a Sovetskii Soyuz -class heavy cruiser, if you flew it through the command centre's viewports

Armaments

I had commented on the tools of violence while painting, but here they were for clarity. In the nose, below the cockpit, there was a front-facing LRM-20 launcher. Next to the cockpit, in one of the wing folds, was a Large Laser. Around the midpoints of the wings there was a single Medium Laser, on each side. Finally, in the base of the leftmost horizontal stabilier a rear-facing SRM-4 launcher was protecting the six.

Photos

This time the offering was a collection of blue-background photos. Maybe suitable for an ASF unit? Looking at the focusing, I should use the actual camera instead of taking these with the work phone.


26.10.22

Return to Monkey Island


Spoiler-free

Released on the international "Talk Like a Pirate" day, RtMI was at least automagically preloaded on the Switch, so I didn't have to waste most of my limited playing time installing and such. I didn't do long gaming sessions, as I guess was expected, something from thirty minutes to something short of a full hour. I also wasn't rushing around, instead I wondered and adventured in peace with all the time in the Caribbean.

My own Monkey Island history was limited to the multiple times completed first two games, and the third one I once loaned from a friend. The fresher entries (Escape and Tales) had somehow completely flown past me, but as this one was the part 3b, did it matter much?

As I was also absolutely oblivious to anything in parts 4 and 5, I also had no idea where they took place. Therefore I had no way of telling how many times we had returned to the Mêlée Island since tSoMI. None of that mattered, the scenery was familiar but also renewed, at least in the beginning.

You may have noticed that I clearly didn't say anything about how the ending of tSoMI 2 and the beginning of RtMI were connected. Based on my memory of the intro I saw once (a quarter of a century earlier) was a bit weird as it ignored its predecessor's ending.

🎶 The Scumm Bar - Ambiance 🎶

My first playthrough on Switch took, according to the device's own calculations, "over 10 hours" and I didn't dig out everything I could and poke absolutely every corner. To be honest, I had to ask for a hint a couple of times from the hint book, and only once to the deepest level. The hint book was a fun thing: you could ask if for a tip to complete one of the incomplete items on your todo list. First of the hints was very generic ("did you already hear about subject x?") and a dialogue option by dialogue option it got more and more specific, until at last it said something like "Go to the Scumm Bar and eat a candle!". The one time I really couldn't get it myself, the feeling afterwards was, as you'd expect: "aaaaah, of course". Gentle shame included.

The vast majority of the puzzles got completed just by going around and doing stuff accidentally the right way, or after a bit of head scratching. Some of the things got solved with the traditional "pick up everything you can as soon as you've seen it", so sometimes I didn't even know what I had solved when I picked it up, before seeing the puzzle itself.

Music of Monkey Island was again excellent and it changed by the situation, as it should. Maybe I could find the OST from somewhere to accompany the first two. As far as I could say, the voice acting worked fantastically, I just didn't remember more than two of the characters and one of them was Dominic Armato's Guybrush. Then again, when I was playing the originals, they didn't have voices but coloured text :D

I had barely finished the game on the Nintendo when I also installed it on to my work laptop. Just to go through everything again but with more familiar controls and a bigger screen. Also because I didn't want the story to end, when the game ended.

A double-thumb-up recommendation from me.

12.10.22

Another new effect experiment

Skirting madness

Who knew what sort of hubris I was riddled with this time, but I returned to poke the Shilone I had considered finished. You see, I had been somehow successful with the Jump Jet fire plumes and the AutoCannon's heat-mistreated metal, I thought I could challenge myself with an engine glow effect.

The engine nozzles of the Shilone were pretty tiny, and I didn't really feel like fighting with the airbrush and masking half the universe, nor did I want to go for a really strong OSL effect that'd light up most of the rear of the ASF. Somehow those have most often struck me as overwhelming.

Blending

So, it was time to jump from mere thoughts to actual actions. I knew that I was going to use the two blues I bought for my Flanker, and mix some off-white with them, so I searched for the paint pots. First one, Citadel Layer series Ahriman Blue was quite thick already so I also went for a plastic syringe (I seemed to remember we had a number of those for ear infection medicines and whatnot) to add cautious amounts of tap water. The second one, another Citadel Layer paint, Temple Guard Blue had dried up into a solid block so it got tossed out. Damn. My plan changed, but just a bit. For shading I used Insignia White (VMA 71290).

Effect test

To begin with I dropped a good lump of Ahriman Blue and thinned it slowly, until I had something that resembled paint more than play-doh. I expected this to be the last time I could use that paint, if Citadel's current quality was to be relied on.

This stuff I used to paint the three nozzles from the inside. It was going to be the darkest layer in the fierce glare of the fusion reactor.


For the next shade I dropped a single drop of off-white next to my blue puddle, and mixed a fraction of it into the blueness. Then I added some of this slightly lighter blue into the nozzles, covering a bit less than the previous time. Rather unsurprisingly I kept repeating this process for a few iterations. In total I mixed six always lighter shades of blue. The end result would've been more visible in larger tubes, but at least I had tried this out.


As the last step I painted tiny single bright dots into each of the nozzles, using an almost white paint. The point of this was to show the hottest spot in the whole shebang. My last photos didn't show them, thanks to the angles. From a normal distance the effect was pretty fun.


5.10.22

Another base plate

An aerial hex

This hex plate was a bit bothersome, as I didn't want to leave it flat black and pretend it was flying in deep space, but muddy goo also didn't inspire. My basic "sand and some weeds" approach didn't sound victorious, either, and I didn't have good sand right now anyway.

Prototyping

Then I remembered my slightly stiff technical Citadel paint that I last used on my Flanker's base/stand. A silly idea I got from that was that I could paint a layer of orange below, then the cracking while drying -stuff and then move from that.

For the first layer I painted two oranges (VGC 72008 Orange Fire; VMC 70733 Orange Fluo (RAL 2005)) in a random way. While wet the paint was much brighter than after the drying time (I also took the photos in different lighting conditions).


Technical mud, pt. 2

Much later I spread a thick layer of this goo (Citadel Technical: Magellan Earth), as I remembered an article I read and how that person told these things behave at different thicknesses, and how they recommended using these.

My Flanker's base had been coated pretty lightly, so now I thought I'll try how a thick layer behaves. My layer ended up being both thick and uneven, which I hoped to result in an interesting result.

After curing until the next afternoon the result was as follows. The goo splintered much less than what I had expected. My expected result was something like "a few large chunks with smaller bits around them" and I didn't really expect to see the fiery-glowy oranges to even show in more than a few selected spots.

Painting on paint

On top of the weak brown I drybrushed my darker general grey (VGA 72750 Cold Grey) and then highlighting some edges with the lighter general grey (VGA 72749 Stonewall Grey). Time-old traditions being honoured and whatnot.


Perhaps it didn't bring a half-molten surface of a lava world, but more like something pretty iron-heavy. But who in their right mind would allow the Kuritas to wage war on Mars itself?