Mastodon

8.11.23

Shades and some previously ignored details

The actual paintjob

Now that my basework of the Archer's paintjob was done, I got to tweak it. It was somehow fun to notice that sometime earlier at this point I'd call my painting done all but for the weathering. Over the years I've slid further and further away from that and added more tweaking and finetuning layers. And I still haven't started doing chipping or somesuch time-consuming stuff.

Taking the black down a bit

Highlighting the upper arms, hips and thigs with dark grey (VMA 71055 Black Grey RLM66) over the flat black was interesting, but I tried to approach this so that the black worked as shadow and panel line decorator. I used the dark grey to cover most of the surfaces, concentrating on the topmost parts to try to follow the flow of natural light. The lower/bottom parts I mostly left alone. When the paint dried the effect was a bit clearer than when wet. All this looked like it worked decently with the naked eye, in the photos it seemed a bit stronger.

I think I reached my goal of highlighting the details of the black-painted parts from the flat darkness.

While I was playing with the dark grey I also painted some of the bits that I couldn't touch the last time as I ran out of paint. These included the insides of the missile bay doors, the lower arm laser cannon barrels, the random bits and greeblies in the Archer's backside. A couple of the nozzles looked like Jump Jets but were most likely heat sinks instead, as this was a steady groundpounder by the specs.


Metallic paint

The only place I used metallic paint (VMA 71072 Gunmetal) were the LRM launchers. I thought that as they were behind the armored doors, they'd stand out nicely from the insides of said doors. I'd wash them darker later so that they wouldn't stand out quite that strongly.


Red paneling

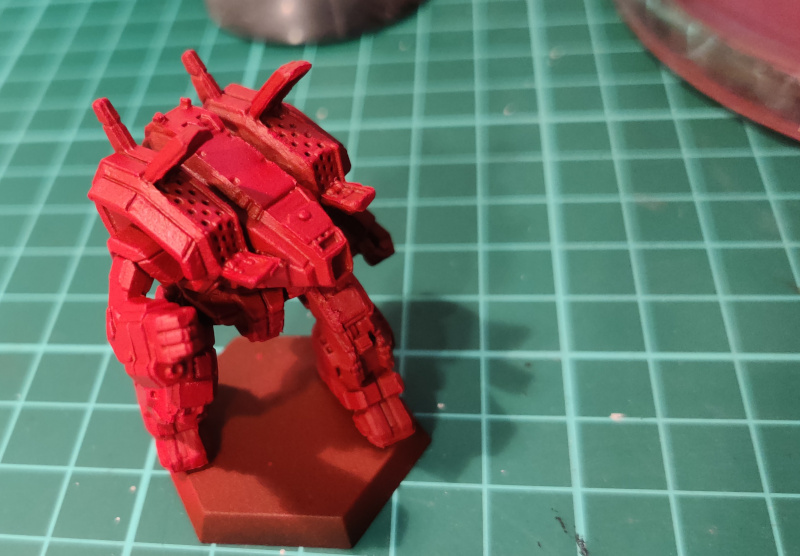
The dark grey panel effects worked pretty nicely on the black so I wanted to do something similar on the red bits as well. My problem was that my basic red was so bright that I didn't have much in storage to stand out, but I also didn't trust my mixing skills to be able to get a slightly brighter red that wasn't straight out pink.

Ultimately I borrowed some Ferrari Red (VMA 71085) from the Project Assistant I and that worked decently. The difference wasn't massive but you could tell. At this point I mostly worked on the upper parts and the protruding pieces like the forearms and the legs.


Detail work

The caution stripes have been my favourite decorations on 'Mechs and such. This time I managed to rein myself in and chose only a few spots to highlight: the inner edges of the missile bay doors, the heat sink edges on the rear side, and the front edge of the hex base.

Of course I encountered a problem with my yellow paint (VMA 71002 Medium Yellow), it was at best a half-wet lump inside its bottle. I plopped out a dollop onto my palette and with some tap water I managed to get something spreadableish. The fact that this paint wasn't smooth or provided even coverage was not a bad thing but was perfect for a worn and suffered surface.


My black paint was still out, and I used the dark grey again. In advance I was a bit concerned of my stripes becoming too faded, but the result was just fine.


Kell Hounds insignia

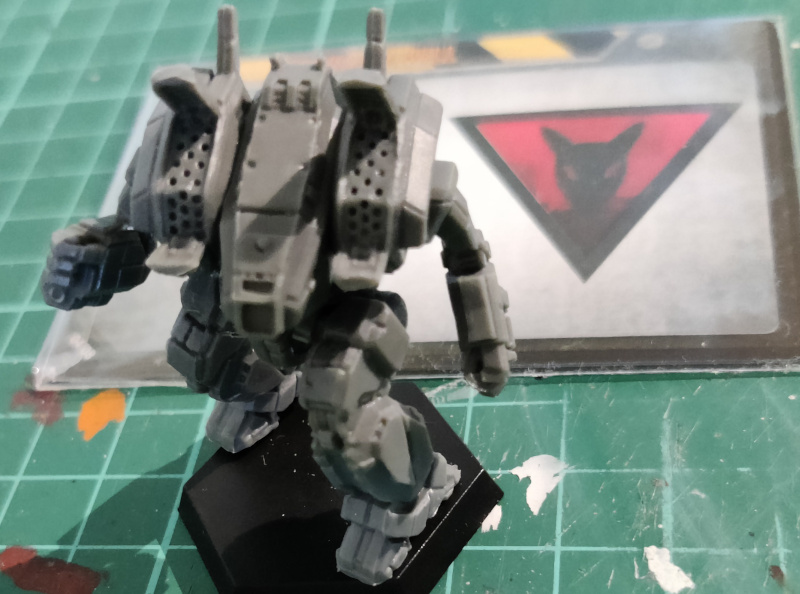
As Camospecs told us the doggies had their insignia on the 'Mech's Left Torso. The insignia was an inverted black-lined red triangle with a black hound's head, something that even I could approximate badly in freehand. I guess I could've gotten tighter triangle edges with a better hand-control or a thinner paintbrush.

This torso had few suitable spots where I would've dared to start painting something as simple as this. My own choice would've been in the middle of the top Center Torso, but as that wasn't according to the specs, I painted it onto the open missile bay door. And yes, I did remember to paint it upside down so it'd be the right way when the door got closed.

This was pretty much what I was going to do for decoration. During my short painting sessions I noticed a few spots here and there that I painted dark grey after I had originally considered myself ready. Now I was content, the red sections were broken down enough but not too distractingly.

1.11.23

Groundwork on the armor

Hands dirty

After a tiny bit of scratching and sanding off plastics I decided that I wasn't going to poke it anymore. Now it was time to paint.

Priming

Ok, so I had managed to completely ignore topping up my storage of primers, but luckily I had over a bottleful of red primer (VSP 70624 Pure Red). I blasted the miniature top to bottom, then bottom-up to get all the corners and angles covered.


Even the photos didn't immediately show any missed spots. Nice.
 

The red parts

If I had any of the gory red that I had used painting the previous Kell Hounds, it wasn't going to pass through my airbrush anymore. Lately I've relied on the RLM23 red (VMA 71003), as you may have noticed, so I was going to stick to it now as well.

I used the flip side of the Alpha Strike card's artwork as a quick reference of Morgan Kell's BattleMech. Based on the small pic I painted especially the lower legs, arms, and the torso from the hip up.


These shades of red differed from each other a bit but not strongly. If I didn't actually know I used different paints, I might not be able to tell it with my crappy eyes...

Blackness

After air-drying the red layers I decided I had a tiny problem with black paint (VMA 71057). My last bottle of black was so low that I barely got a thin layer of it painted to give me a guideline for the dark grey layers.

How did this happen? Black had been one of my main paints for ages. I realized it right away: I've moved without noticing away from the extreme colours also in the bits that are instructed to be painted as black/white, because they are somewhat unnatural-looking in these scales.

That wasn't too much of a problem, this black layer had the honour of working as a pathfinder and the base of shadows. Just about everything I painted black was going to be overpainted with dark grey (black grey or german grey), and maybe they would also get a slightly lighter grey over them.

These photos didn't show too well that the area between the side torso's armoured ridge and the shoulder was red. While painting the other bits I was thinking if that ought to be black too or would a dark wash be enough to differentiate it.

The past ISD made one sort of a decision for me by not buing more black paint, so at least today those bits remained red. Perhaps I'd practice making fake shadows with the oil paints, this could be a fantastic guinea pig for such a process.

A couple of red bits were shining through in the hips and on the antennae, so I had ran out of black a tiny bit too soon. This last photo showed how I had decided to paint narrow strips of the lower R/L Torso black, to break the monoblocks of red in the torso. It felt like a good breakpoint, especially from the viewpoint of a vehicle or an unfortunate foot soldier.

Next up

Next time I'd paint over the black parts with grey and go through the metallic parts (laser cannons, missile launchers, the insides of the missile bay doors, the hinges). I should also go over the cockpit canopy bits too, so that the green jewe effects would have convenient dark frames.

25.10.23

Project II/23

Legendary but not the Legend Killer

My previous project was supposed to be a bit of a quick snack, but it did eat an amount of time after all. Now I wanted to do something even quicker to cleanse my palate, before jumping onto a larger-scale model again.

I rummaged through my Clan Invasion box and checked what the random boxes had, those unmarked ones living next to my two untouched Star boxes. From the list [Urbanmech, Stormcrow, Mongrel, Archer] I popped out Morgan Kell's modified Archer. The man may have been a legendary 'Mech jock, but the 'Mech itself was a bit boring compared to many others. Of course there were much uglier ones, so this was still ok.


My plan was just to paint one individual 'Mech without pondering on how it would fit into a larger collection. Of course I already had a Lanceful of those awful plastic -molded Kell Hounds from twelve years ago ([Clint, Spider, Panther, Hunchback]) so this wasn't going to be a complete loner. Then again, with one more I'd have five doggies and I'd need three more to fill up the second Lance.

Not every Merc unit needed to be fully equipped and army-sized, so I wasn't going to stress too much about it.

Randomly wandering thoughts

At this point my pre-made plans or thoughts about this project were such that the basic paintjob would be quickly done. Fine-tuning it shouldn't take awfully long, either. I'd spend at least twice as much time with the details (metallic parts either painted metallic or dark grey, right now I was leaning toward metallic paints; green cockpit windows; laser cannon lenses (4); individualizing as in the KH insignia and potential highlights).

Panel line and shadow washing with oils – and cleaning that all up again – would eat something over an hour, a potential dot filtering less than an hour, maybe some modulation would round it up to an hour. In practice the oils would require long drying times, but I wasn't counting them in in my project time even if I could.

The hex base would take two sessions: the surface textures first, then painting it. All in all it should be quick. If I chose to do some water/mud effects, it'd take a bit more time but most of this would be waiting again.

Maybe all this would be done within the hours of a normal workday. The fact was that my calendar had been challenging, to say the least, for a good while, so despite its apparent simplicity this might spread over something like two months. It'd be fun to see in the end how this guessing of mine has hit or missed.

18.10.23

Finished: Project I/23

An Assault Starful of hardware

Well, it took some time after all despite my idea of doing something quick, and I got to try new things again. Most likely the next one wasn't going to include anything totally new, or at least while I was writing this I had no real idea of what I was going to do or what could I even try.

I noticed that I was thinking of this a year ago, but I really should take a couple of comparison photos of these newest CGL 'mechs with the ones I painted last year. Each of these five I could also pose next to an IWM miniature (or a couple of them) that had been painted over a decade ago, to see how my paintings and the paintables differed.

Dire Wolf Prime #231

The people of Draconis Combine called the 100-ton Dire Wolf the Great Death (大いなる死). It was a mad unit indeed, with an LRM-10 rack on the shoulder, both arms with UAC/5, each with a pair of ER Large Lasers and a pair of Medium Pulse Lasers.


Summoner Prime #235

The freebirth little prince named the 70-ton Summoner based on some hammer-wielder from Norwegian lore, because of its weapons: lightning (ER PPC) and thunder (LB-10X) plus the LRM-15 launcher on its shoulder.


Gargoyle Prime #221

In the Assault class the 80-ton fugly Gargoyle punished the Spheroids (among many others) with a pair of LB-5X Autocannons and their underslung SRM-6 packs. It also had an ER Small Laser installed into the chest, maybe to carve some obscenities into the bunker walls of its foes. The baffled Spheroids named it after the Man-of-war ship class, most probably because of its size and the broadsides. Weird people, those.


Mad Dog Prime #222

The servants of the Dragon had given their own name to the Mad Dog, as well – for some reason they called it a Vulture (ハゲタカ) – because why not? Barely in the Heavy class this OmniMech has always been to my liking, a fantastic machine. The LRM-20 racks on the both sides of the cockpit were just a fun approach to life, the arms then housed Large and Medium Pulse Lasers, symmetrically the same set of death rays in each hand.


Hellbringer Prime #223

A sibling 'Mech of the Summoner, the sixty-five ton Hellbringer worked awesomely as a pair, which was most likely the reason the little prince's henchman Galen Cox decided to call it Loki. The amount of weaponry, especially in the eyes of freebirths, was indeed shocking: ER PPCs in the arms, an AMS above the cockpit, a cluster of three ER Medium Lasers in the Left Torso, a SSRM-6 launcher, four AP pods in the legs against any infantry, and to top it all a pair of Machine Guns in the Right Torso. Still there was armour and cooling fins for actual operations, just like on its sibling.


The end

These five didn't really belong into the same Star, at least in my current list of the Cluster, but based on their unit numbers they were from the Trinary Beta's Stars two and three. Of course that made no actual difference, because I was never going to play anything that serious, I was just doing all this collecting, painting and organizing just for the sheer fun of it. I may have mentioned it a bunch of times already.

Next Wednesday I should have something new going on. At this point I was thinking between two options, at this rate I'd end up tossing a coin.

11.10.23

Final detailings

Hex bases with their jade stripes

To keep things simple I painted the edges of the bases flat black. While I was playing with black I painted the barrels of each of the Autocannons as they were a bit too light in dark grey.

Earlier I had been thinking if I'd paint the lower third or even half of the front-facing hex edge with jade green, but based on a freehand attempt it didn't look as neat as I had hoped. I then painted the full edge in green instead.

With a bit of masking and a new layer of black those could be transformed into having a caution stripe, for example. I left these thoughts simmer while the second layer of the gloss varnish on the energy weapons was drying.

Metal pigmentage

This one was a pretty quick operation. I dropped some AK Interactive's Dark Steel pigment onto the palette and added thinner on it. When I had a thin enough liquid mixed up, I applied that on the metallic surfaces of mine. These photos were taken in a somewhat funny lighting conditions, and in general I felt the pigment didn't stand out as interestingly from the German Grey surface as from the Jagdpanzer's camouflage colours.


Despite my earlier ramblings I didn't use any acrylic water on the muddy bases.