Mastodon

21.8.24

Panzer IV surface texture

Trying out uncle Night Shift's methods

The occasionally mentioned work Slack's miniature painting channel had a colleague asking about my T-34 turret, if I had made the cast texture using Night Shift's method and they said they'd used it on some concrete floor basing on WH40k bits and that the method was pretty simple.

That encouraged me to try out these two methods for creating the steel texture.


Method 1: liquid cement and a stiff brush

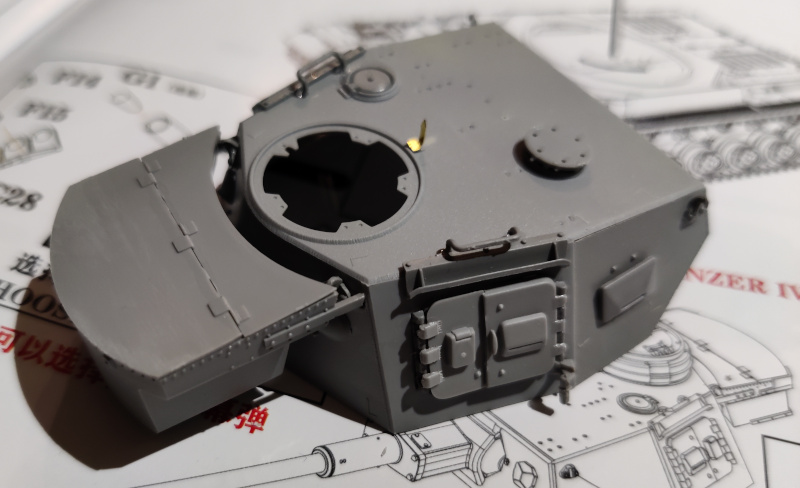
Because all new experiments and such should always be tried out in an invisible or easily hidden place, I started from the turret's left front corner. I had an old and mistreated brush that I was going to throw away. It had its chance to serve the last time before being released.

I used the brush to spread the Tamiya's thin cement like paint and left it for a short bit to do its thing to the plastic. Then I stabbed the plastic with the brush pretty randomly. Softened by the glue, the plastic deformed gently. This effect looked pretty neat so I continued around the turret's vertical bits.

From the turret I proceeded to the hull full of tools and did what the space allowed me. In the first photo the surface was just softened by the glue, in the second photo there were some markings caused by the brush-stabbings for comparison. I also processed the Panzerwanne's sides even if they really weren't going to be much seen in the final model.


Excitedly I also did this on the front- and rear armour plates. The vertical or vertical-ish surfaces like the decks I didn't touch.


This final photo showed some brown tint on the rear armour and that was caused by impurities on my ancient paintbrush that started affecting my operation only in the end. I thought that this'd dry mat after drying by the next day, but I was wrong. The glue-affected bits remained glossy which was a bit confuseing, but didn't affect the end result.

Method 2: putty diluted with liquid cement

I truly could've left it here and be happy, but while prototyping I wanted to try the next stage as well. As I didn't currently own any of Tamiya putty that mr. Kovac recommended, but Mr Hobby's Mr White Putty that I have never liked too much as it started kicking quickly and immediately after getting exposed to air. I trusted that diluting it with the thin cement the drying time would be somehow slower.

Using my old jar lid as a mixing palette I used some putty and quickly mixed glue into it. As the putty was so eager to kick, I used more glue than I expected to need, so I could get it into a paintlike consitency to be brush-appliable.

Dried glue-putty effect

Sanded-down glue-putty effect

In the front of the tank I did my best to avoid going over the edges, so the result was more cautious than what a bit more experienced user would've achieved. Had I been more eager and daring, I might have used this on the radio operator's machine gun mount and more on the driver's periscope shield. On the first try I thought it was better to take it easy.

Working on the right side of the tank I was cautious of the antenna system and trusted in the method 1's texturing worked nicely enough on its own.

The left side had lots of junk attached, so I mostly concentrated on the areas where applying the glue-putty goo was safe.


None of these showed that after a bit of a break to let the stuff cure I sanded down all of these freshly textured sufaces with a sanding sponge. As it was now it looked pretty weird, but I had confidence in the power of paint making this make sense.

14.8.24

Panzer IV and the third party tracks

Articulated third-party individual link tracks

The title may have spoiled the decision already, but I wasn't going to bother with the kit's own link & length tracks at all. My first tracked model ever (Revell's 1:72 StuG III with a Saukopf) had those and I didn't like them one bit. Either I got traumatized by them or maybe I was just an unforgiving person.

Panzerwerk Design

Some time earlier I encountered Panzermeister36's review of a bunch of 3d printed tracks in YT and based on that I ended up looking at two different companies. Wasting time with the customs didn't really entice me so I thought I'd prefer the EU inner market and order something from the Polish Panzerwerk design, if I could figure out which of the track types (1-8) was correct enough. My other options were T-Rex studios and Tankcraft, the latter used to have the Adam Mann -consulted tracks but all of that had disappeared from their webshop. I guess they didn't want money.

Of course I had been thinking about this for ages, and during easter '24 I finally pulled my shopping pants on and dragged myself to the online store.  Then, for a good handful of days the site only returned a HTTP503 error and the console logs weren't too useful. When complaining about this out loud the store got back online the next day or the day after that in the middle of all of my back-and-forthing.

Only in the checkout stage it was said that the only payment method was paypal, which I was a bit allergic to and avoided whenever possible. So I left the almost neighbours hanging and checked my second option (spoiler: I didn't choose them but went with this set here), which I documented in the next chapter for the sake of completeness of this story.


My calendar in the Spring absolutely horrendous, so on the Monday when the courier was supposedly delivering my order the window was "during the evening" and on that single day we couldn't guarantee that someone would be home to accept it. So I accepted the shittier option of "I'll get this from a nearby fuel station instead of you carrying it to my door like I've paid you to" and another day's delay because why would these companies work in a reasonable and sane manner?

The funniest thing was that there was someone home all evening that day, but we didn't know that when the decision had to be done :D


T-Rex Studios

These people also had some Type 3a tracks available, so I took a closer look. The price was lower and the webshop also appeared to work.

So, sixy 'murican monies for the bits and S&H, plus customs and VAT. This would be tolerable. But when I got to the payment stage the only option was, again, paypal.

If I really had to use paypal, I'd at least then skip the customs part if I could. This was the only reason I rechecked the Panzerwerk store and would you look at that,  now it worked. Otherwise I'd ordered the T-Rex tracks without any additional grumbling.


Resin tracks in action

On a Tuesday evening I fetched my packet from a fuel station that doubled as a courier's client's pickup point. The box contained very simple instructions and three ziplog bags full of pieces: the track links and both A and B pins to connect the links together.


The track assembly operation

Those A and B pins were just about the thickness of a cat's whisker, and using those with these (comparably) sausage fingers of mine was interesting to say the least. I assembled my track one link at a time by holding the two attachable links tightly between my fingers, then inserting the pins one by one and immediately pressing them in with my flat-tip tweezers until they made their tiny "prip" sound.


You all knew I had to try the track out as soon as I had a short lenght completed to see how it wrapped around the drive sprocket. It fit like it was made for this.

Supposedly I had an excess of track links so in addition to the driving tracks I could maybe make some track armour from these.


Getting the right side track built took three evening sessions from me. Some of the time went to fiddling around, pondering, and finding out the way to work on this thing. And let's be honest, playing dry-fitting and testing took some time too. After the slow start I found a good method and the throughput got noticeably improved with time.

Thanks to that the left track progressed and completed much more rapidly, as I now knew how this worked. And I also had the feeling for the pieces.

While working on this I also made a short bit to be hanged in the front. Of course I didn't dry-fit enough at this point so I accidentally built it a link too long. I still had a bunch of links and pins so no panic, but I still paranoidly hoarded two pairs of A/B pairs to connect the actual tracks in the end.


7.8.24

Panzer IV turret and the long cannon

The last assemblies

In this happy stage of the build process I just had the turret and the tracks left, of these the turret was more interesting a subject. Anyone who's ever built tanks might agree with me and if they didn't, then they disagreed. For each their own.

Turret f2

Working on the turret's f2 version started with the front edges getting the hatch-holed armour plates. In the ausf G these would've been solid instead.


The raised edges were also to be sanded or filed away as well. I took off the bulk of them with the xacto blade and then sanded the remains down. My result was most likely imperfect but better than if left untouched.

When my other gluings had cured I attached the hatches (closed) onto the turret, I didn't think it made much sense to leave them open if you could only see vast emptiness and a part of the cannon's loading end. There was a silly amount of additional details, in the end I managed to break off only the little photoetch arrowhead, which I presumed to be the "this way forward" sign for the commander to get a bit more of a sense of the tank's alignment when peering out from their periscopes.


While working on the surprisingly flimsy side hatches, I also built the basket that was destined to be installed behind the turret.


75mm KampfwagenKanone 40  L/43

This was where the lottery in the world of choices did: the nice metal barrel was meant for the even larger G-model's L/48 cannon and I couldn't use that in the f2 in good conscience. I'd keep it for later, so the loss was measurable in time only.


Assembling the cannon was pretty straightforward business, even if a bit flimsy in a couple of stages. The tiny bars of the rear part were about to give me (more) grey hairs but in the end it worked out and nothing was going to be seen anyway, so why was I worried in the first place?


All this was to be attached together and sturdily.

Fun detail: the tiny corner hatches could've also been made openable if the assembler hadn't broken one of the two hinges while detaching it from the sprue. The assembler might have been pretty excited about these opportunities, had the tank had something inside to show.


Amazingly the construct was still movable, the cannon's elevation was still changeable. That was great, even if there was no real need to play with it in the end.

Cannon into the turret

The cannon fit into its slot in the turret pretty nicely. The most challenging moment came when all the three connecting surfaces were to get aligned in place at the same time: the turret's shell, the cannon with its shield, and the relatively small-footprinted turret's inner floor / ring part.


Commander's cupola

The final subassembly was the commander's cupola with a cool collection of periscopes. According to the instructions there were two types of periscopes to choose from: open and closed ones. Were these another all or none -options or could they be played with individually? I dangerously assumed that the commander could do what they felt like in the real thing, but for my empty tank I chose to be totally buttoned up with closed 'scopes. Still, I really appreciated the option I had never encountered before.


This cupola didn't have a rail for the MG, nor the MG itself, but I wasn't missing one either.


Being a worrier, I was gently worried about the turret fitting into the hull, and if the turret survived the pressing-turning operation. As usual, I was worried for no reason.


Dry fitting, cont.

As I did so often, the tank's bits had to be dry-fitted and admired from different angles. For the fun of it I piled on the tank some of the extra stuff, like the jerry cans, just to see how it looked.


It looked fine, to me at least. The tracks and a handful of paint layers were left anymore. So almost done, right?