Mastodon

9.4.25

Launcher crew painting

Another new approach

I did spoil this operation earlier, as I was airbrushing the guys in preparation for this stuff. There was absolutely nothing new in this in a way, slapchop or slap chop was a well-known method already. I just had never tried the contrast paints, so I had to do something a bit differently. My homebrew recipes also increased the potential problem field, but that was life.

Before starting properly I drybrushed them quickly with white. That was done because my airbrushed zenithal's coverage wasn't as good as what I wished.

The skin colour game

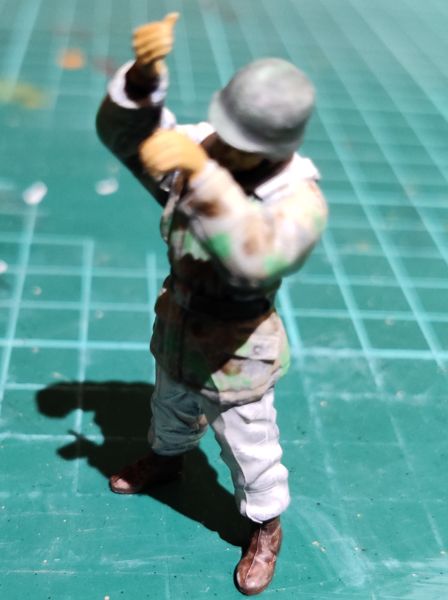
For the first step I rummaged in my collection and looked for my pretty old skin coloured paints, based on the posts I had used them in 2016 on the A-10 and the submarine captain. Both the Vallejo Model Color Dark Flesh and Medium Fleshtone were still in liquid form, and of those I chose the fleshtone. The idea here was to make a filter, which was practically some incredibly thin paint, and apply it lightly on the guy so that the underlying greyscale would provide all the shading and the filter provided the colour.

My first layer of fleshtone (VMC 860) made their faces look more like nightmares straight after painting. I doubted they'd look much better after curing, but the plan was to apply more layers, so I wasn't stressing about this yet.

Leather boots for marching

I was thinking that I was supposed to have a bottle of chocolate brown, but the cats were sleeping on my storage space, so I used some AK Interactive's Mahogany (AK11106) as a substitute. I also wasn't sure if my old VMC paint was even technically countable as a liquid anymore.

Based on one layer it was a nice colour, but maybe Heer wasn't using that kind of boots. So I had to find the chocolate brown that I was absolutely certain I had seen last week.

The next evening I did find my paint (VMC 70872 Chocolate Brown) and I thinned it seriously to give the boots a new, darker, layer. Not that the mahogany first layer was bad under it, I thought. My idea of army boots was always simply black, but I was going to follow the instructions and wiki instead of making crap up myself.

Uniform pondering

Judging by the seams and padding the outer clothing was quite wintery. I was just thinking that as I started with the bare skin and the fingers looked like hands instead of gloves, they had to be in the Spring side of the winter already, on the last snows of the season. To support that idea I could attempt to give them coats with the snow side turned out, and the pants with the camo side out - or maybe it would be smarter to do the opposite, with the last snows on the ground and the darker treelines with branches above. Any reference images I found constantly showed the Germans with 50/50 with camo pants and snow coats, maybe to make them stand out more.

Doing any kind of a camo pattern with super thin paints was going to be difficult in any case, but if I only had to do that on half the clothes instead of both... This'd be way too boring without any challenges, so that's what I was going to go for.

Winter coat - Splintertarn

I started the painting of the camo side of the winter coats by thinning some Sand Yellow (VMA 71028) very heavily. Then I spread my ridiculously thin paint over the coats and left the white snow sides and the underlying tunics untouched. Either this paint was way too thin or just perfect, time woudl tell. Extra layers were needed in any case.

Before I got any further with the sandiness, I wanted to prove the awesomeness or stupidity of my camo pattern idea, so when the first winter jackets were dry, I thinned down some green (VMC 70942 Light Green). With that paint I drew some shapes straight over the sandy parts without any actual plan.

To get the brown parts I thinned more chocolate brown and kept on with the program.

Based on this first round I felt I thinned my greens and browns a bit too little. The sandy yellow would require at leats another round to be a bit stronger, the others might not need anything else.

Tunics

According to the wiki the M/41 tunic was to be field grey (a grey-green shade), with the collars in the same colour, as opposed to the earlier green collar. There wasn't much more visible than the collars, so it wasn't a big operation. Or so I assumed. I decided to paint the tunics simply with a thinned down green, as I didn't have a perfect colour ready and I didn't trust my mixing operations and especially their repeatability.

Mr B's tunic was the only one this nicely displayed. The others had their winter coats much more tightly pulled shut, but it'd been pretty boring if all five had the same setup. I'd reinforce this part on a couple of guys with a new layer of paint.

Winter coat - the snow camo side

There wasn't much shown of the snow sides of the coats, each guy had their own way of wearing the outfit. Most of them just showed the lapels turned out. so those were the simplest parts to start with. Those, who I decided to give an inside-out hood, got a white hood, and the others didn't have much showing on that end.

Winter trousers - snow camo side 1

When the winter coats were painted and cured, I flipped the guys upside down and started painting pants on them. The first layer was as thin as expected, but still changed the overall look surprisingly much.


Steel helmets

A Stahlhelm was supposed to be grey-green. In a winter situation they were sometimes also painted white, so that would've been the direction I would've chosen, had I not decided to make the bottoms white and tops camouflaged. I decided to mention this here, for some future searches to remind me that yes, I had thought of something at some point. Of course one (or two) of these chaps could have a white helmet just for the fun of it.

I painted the helmets in the same run with the coats, using two coats of paint. For the base of the helmets I used a strongly diluted dark grey (VMA 71048 Dark Sea Grey) and thought that I could top it up with a hint of green. In this first photo below the dented dark grey looked pretty damn nice. This photo was taken after the first go at the winter jackets.

Before painting the tunics I added some of that green on the helmets. Was that a smart thing or did they end up looking more like rain-wrecked and moss-growing relics?

Belts and other details

The belts got three sessions, and after that I was content with them. I could've left the belt buckles as they were, greyscaled already, but I wanted to highlight them better. The main bodies I painted with gently thinned VMA Cold Grey, and then I highlighted the edges and the marking in the middle with a very careful brushing with VMA Steel.


Waffenfarben - or the blocks that showed your branch I painted red for artillerymen onto the collars of the M41 tunics, as far as you could see them and where I could reach with my paintbrush. As this photo showed, my skills weren't good enough for the grey II marks getting amazingly anymore.

First I thought of using the same thinned down paint method for the chin straps, but after the first strap half I decided that just a slightly thinned black worked better. They didn't have the original shading left on their faces anymore, so the benefits of multiple glazes were nonexistent.

The often-looked at wrist watch of the launcher leader got a black basecoat to begin with. When the black paint had dried, I painted the body of the watch with steel.


Finally I painted a black face on the watch, the arms I most likely wouldnt' attempt. The hour markings I most definitely would not even dream of.

Yeah, the next evening I stole a few moments to paint some very thin white lines into the watch face. Now I needed to apply a gloss or satin varnish on it to complete the effect.

Winter trousers - snow camo side 2

At this point I painted the snow trousers (and the coat details) for a second time. This time I thinned my white a bit less than before, the shading looked like it still remained in existence. Now the dudes had a pretty good-looking set of snow gera, of course they wouldn't and couldn't remain pristine in the nature and while carrying soot-crusted stuff and firing rockets around.


Eyes

Getting some facial details on the guys couldn't be postponed forever. Based on some things I had read the eye whites were not important in this scale and viewpoints, so I ought to be ok by just painting coloured dots for the eyes. I picked three colours just for the variety: Goblin Green, Chocolate Brown and Electric Blue. Then I asked the Project Assistant II if she wanted to deal out the eyes and she was more than happy to sort the guys.

I took some immediate closeups when I had painted the eyes and before I fixed the overflows. The photos were awful, so I wasn't going to share them here. To fix the faces a bit I mixed a bit lighter shade from the medium fleshtone, and applied it on the noses, chins, cheekbones to add variety to the faces. Finally I brushed a bit of chocobrown on the mouths and ears to get more shadows in place.

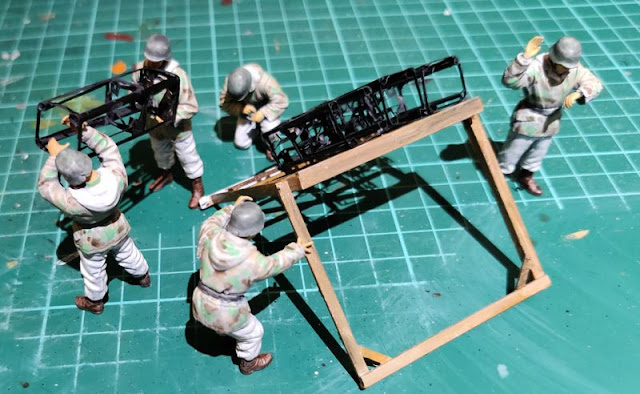
In this latest dry-fit photo the guys seemed like they ended up looking pretty fine, so I could declare them practically done at this point. Of course all weathering was not even started yet, so no worries, they wouldn't be as if they had just come from the laundry shift.

A couple of my guys had lost their helmets at some point or another, and I had quickly just superglued them back so I wouldn't ruin paintings with the thin cement. So I hadn't realized to clean up the overflowing superglue goo, and these two had some weird crap on their foreheads and it was most clear on the watch-watching mr E.

I came up with a silly idea and decided to cheat by painting the glops white and declared them gauze. Boh guys had gotten some shrapnel damage or something of that sort. Maybe they'd both have clean dressings on their wounds or I'd weather them to look disgusting. We'd find out later.

Mr A, setter of fuzes

The greyscale starting point:


The unweathered state:


Mr B, ammo guy 1

The greyscale starting point:

The unweathered state:


Mr C, ammo guy 2

The greyscale starting point:

The unweathered state:

Mr D, adjuster of things

The greyscale starting point:

The unweathered state:

Mr E, launcher chief

The greyscale starting point:


The unweathered state:

2.4.25

Launcher's woodgraininess

Uncle NightShift's woodgrain effect copying attempt

The principle in this method was pretty simply. The base was a white or off-white -painted plastic, that had been scoured with a metal brush before painted for the woodgrain effect. Using different browns and greys (the source video had used black and dark grey) little oil dots were put on the plastic, and all that was blended with strokes going along the woodgrain.

I had no black oil paint, so I chose from my collection. The setup ended up being four browns and light grey as a bonus:

  • ABT002 Sepia
  • ABT092 Ocher
  • AT170 Light Grey
  • ABT093 Earth
  • ABT130 Dark Mud

First oil painting session

The dots I applied with a couple of toothpicks, I started by doing this on one end plank. Maybe I could've been fine with fewer dots, but my previous dot filtering attempt was from a couple of years ago, and then I was tweaking a camouflaged surface. This time I was trying to get something from nothing instead.

After a few swipes I had a light brown plank. I added a couple of darker dots and blended them, as I felt this plank a bit too monotonous. The best thing with oil paints was always that if the result didn't satisfy, it was so very easy to tweak more.


Anyway, I wasn't disappointed in how my first wooden plank looked like, or how painting it with oil paints went. I proceeded to paint the next beams, one by one.

At this point I had to decide what I was actually going for. Either all the wooden parts would be as alike as I could manage, or they'd be whatever and the frame was built of those wood parts that the assembler(s) had available. I decided to go with the "a poor builder cannot afford to be picky" and painted just about all of them in a different way.


Amazingly I got just about the full frame painted in one longer painting session. That rocket packet -side's bottom vertical one was the bit I held on to, so that was going to be painted when the others were at least touch-try. This wet paint was pretty shiny, but I was quite pleased with the overall look already.

Two days later the shininess had gone down a bit, but it wasn't dry by any measure. I wanted to share this photo, as it showed the woodgrain effect much better.


I was thinking of later using one of the darkest paints and then paint some knots as littledots, and the branch shapas as little < angles. With a gentle blending they could bring more woodness into this. We'd see later if I got that excited about this idea.

Second oil painting session

A week later I painted the missing extreme ends' ground-facing bits. The original paintjob was still not completely dry, but it was ok for this work.

This time I limited my paints to three: Earth; Dark Mud; Sepia. The wood beams I painted with the earth and dark mud dots, then added here and there some random sepia dots and the aforementioned angles. With pieces as narrow as these, the < . > shapes didn't survive in the way I hoped. I'd try that trick again later with larger surfaces.


Now it was all painted, and I left it in the box in the sauna to dry for a week. Maybe for two weeks, even.

With enough time passed I coated my wooden setup with the super matt varnish. Maybe I'd need to use satin varnish instead for a more natural look. At least the oils were now protected.


26.3.25

Launcher details

Painting at last

Now we got to a more fun part in this operation. The assembly had been, thanks to the photoetch stuff, a bit frustrating so priming was a mood lifting moment. Painting the details was even more fun.

Green green rockets

My first idea was to use blu-tack to stick everything for painting, but I had thrown mine out as it had dried completely. It was about 23 years old, so it wasn't a huge surprise. Instead I used a few old pegs and brushed the rockets green (VMA 71022 Light Green).

When the warheads were dry, I painted the remaining parts. I painted the rocket engine nozzles dark grey just to get them a bit different. Before installing these into their crates I had to gloss varnish them, apply decals, and matt varnish them to seal the show. I still hadn't invested into the decal solutions, so I was using just water and very limited patience.

Rocket crates

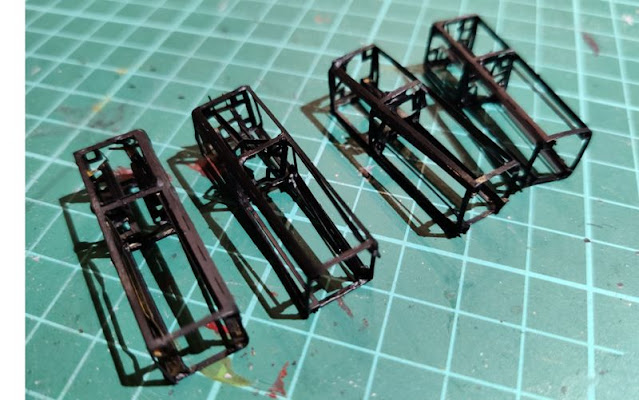
This solution cannot have surprised anyone: I started the painting of the crates with dark grey (VMA 71055 Black Grey RLM66) a piece at a time. Some of them I had to touch up a few times, some of the more difficult crevices didn't want to accept paint that easily, and I didn't notice that from more than a few limited angles. For example, this photo here showed a bit of plain metal in the rightmost crate's left bottom edge.

In between all the other pieces I patched my rocket crates first with black where I saw plain or almost plain metal. The frame edges I painted with the dark grey, not aiming for perfection but decent looks, piece by piece. I still had a few steps of that work to go, especially if I wanted to get dents or scratches on my boxes. With the assembly results not many extra dents were even needed anymore.

Posture test fit

Trying out a random crate, this one was a bit difficult to align with the hands of the guys. Or maybe their hands were poorly aligned when I built the humanoids. Right now I just wanted to see how this looked in general.


Preparing the wood painting

Over the black primer I airbrushed some off-white (VMA 71119 White Grey) to get as simple starting point as possible. The wood had been difficult in the past, so I was worried of this prominent detail. A white basecoat was what the video clip I linked to the last time was suggesting so I wanted to give it a go.


Personell process

While playing with the airbrush and white paint I also prepared my five plastic nazis. I aimed downwards from high angles, my goal being strongish light/shadow effects as a base, on which I could just apply thin layers of colours. Or then I'd use contrast paints that I didn't own at this point, so maybe not that.

Once again I was dry-fitting to see how mimicking the box art felt like:

Decals

There were only four decals in this whole set. I prepared my suffering with a layer of Vallejo's Gloss Varnish on the rockets. This was done like the painting, in two stages, to ensure full and messless coverage.

When the varnish had flashed, I sliced off the two decals of each of the rocket types, which left me with a backup copy of each. Just in case I cocked this up somehow. For a change I didn't feel bad about the decal application process, as they set in place pretty nicely.


With the decals dry I dullcoated them in two stages. This time I used AK Interactive's Super Matt varnish.

Extremely funnily three of the rockets fit inside their Packkiste crates, one of them didn't. Or to be more exact, that one Packkiste couldn't accept a rocket. This one rocket was going to be the one that was being tweaked by the launcher.

I might have been a tiny bit agitated, had more than one of the rockets been left out of their crates. The rockets looked decent already, but the crates needed more care and weathering. Maybe I was going to come up with something silly for the rockets as well.

19.3.25

Launcher's priming

In the core of blackness

Predictably I had had enough of swearing with the PE bits, so as soon as I could declare them done I started pondering on the painting processes. It was going to start with a primer, that being Vallejo's black primer again. And that was where the certainty also ended, as the follow-up steps were full of questions and uncertainties.

280mm and 320mm rockets

The rockets got painted in three sets, but I kept on holding, like the photo here showed, with my nitrile gloved fingers from the nozzle end. To finish those bits up I had no time when I had to stop airbrushing, so they had to wait for the next session.

I believed that these had to be painted green in the end, except maybe for the nozzles of the rocket engine. At this point I was interested in knowing if the barrel and the warhead body were of different materials and therefore of different colours. I had to investigate that, but my expectation was "they were all the same".

Personell

Like the rockets, I painted the little nazis in three stages as well. First from one side, then left them to dry while I primed some other bits. When the carousel had taken a full round, I flipped the guys around and blasted from the opposite end. On the last blast I fixed what I had missed before, if there was anything left unpainted.


An A stand for Ammunition

In the real world I started my painting operation from the rack, but that made no difference to the photos or this text here. Like the previous two subgroups, I airbrushed the rack in three separate runs.


This photo didn't show the homemade woodgrain effect, but maintaining it was the reason why I started priming with the airbrush in the first place instead of quickly paintbrushing the coatings on. Painting that wood was the next scary thing, but I was thinking of giving Uncle Night Shift's semirecent method ("I Made A Diorama From Google Street View!" from Nov 2023, linked to 22min 11sec) of oil painting wood texture on carved plastic. Of course I could also give another shot at the AK Interactive's wood colours but drybrushing this time instead of making an ugly wet mess.

Crates

My rocket crates were, thanks to the shapes and overlapping bars, the most difficult ones to prime. I left them to dry and thought that I'd brush any missing primer the next time. Otherwise I'd lose my nerves and an unacceptable amount of time. Already at this stage they were, I was happy to notice, looking much better. Just having the superglue frosting gone from the visible surfaces was a source of happiness to me.

Had I thought of the crates a bit more and in peace, I might have considered adding some surface texturing on them, using the Night Shift method. But thinking of how annoying building them without good tools was, and how much superglue (too much) I had resorted to using, maybe it was wise to ignore that idea without even thinking of it to begin with. I wasn't usually in the habit of digging blood from my nose, not with a prybar or without.

12.3.25

Launcher's photoetch crates

Enjoying flimsy metallic things

Session I

I had to start pretty much from scratch with the first crate. The main reason was that those crow's feet were poking in random directions so badly that I had to press them straight again with my tweezers. A bit like working on misbehaving Metal Earth Models bits but much worse.

Attempting to learn from my first failure I checked what youtube offered and based on that I started using a plastic ruler and an old exacto blade to make the bends. This was the closest I could get to the recommended minimum toolset of a metallic ruler and a razorblade. Whatever I had already done was pretty much bad, but the next ones at least felt like they got bent nicer.

Despite the minor improvements this narrower bit that was going to be holding the rocket's narrow engine was still pretty much horrible. Getting the pieces aligned was also quite weird. In the end I got some kind of a subassembly done, but certainly didn't look decent.


Sessions II - III

Giving completely up on the instructions I snipped off everything from the PE sprue to get the main crate out. I bent the external edges to as close to 90° as my tools allowed me to, and forcefully inserted the subassembly inside it. Then I added an amount of superglue to somehow seal the setup.

After this was out of the way I thought I'd try a different approach with the second rocket crate. I started by bending the main shape first and glued its edges shut. Again the fourth and last bend ended up the worst and I wasn't quite sure why that happened.

Maybe this was foreseeable: when the crate's gluing was cured, I started gluing the subassembly's rectangular bits straight into the crate itself. I expected this to allow me to get the short and L-bent double-T-shapes easier into place, and to make it look a bit healthier.

My first crate was so awful indeed, that I decided to not bother that building order again. Instead I committed to anything else but that, and the result was going to be what it was going to be. My expectation was that the other three would be somehow better anyway.


During my first three oath-filled sessions I didn't get any further than what the photo below showed. The superglue I started with was ok to get PE pieces onto plastic models just failed miserably here or had gone bad already. I bought some gel-like Loctite for the continuation, as it promised to be strong and to tolerate some amount of torque. Of course it was going to flash slower than the runny stuff, and I didn't own any zip kicker, so I bent the bits, applied glue, and left them cure overnight as I did my hobbyings in the late-ish evening.


Session IV

During one evening's hobby time I got the little walls somehow installed into the last two crates. I also added the long, lengthwise-installed L-shaped bits into the warhead section of the first crate. Installing those was pure horror, as I guess you had guessed already. In addition to the bits themselves were in an imperfect shape, the superglue used in quantities to hold anything in place.


Session V

One of the evenings I added the long beams into the front end of the second crate. My approach of pressing the bit against my cutting mat with the ruler, then bending the other half to right angles with the ancient exacto blade was unreliable. In case it didn't work on the first go I didn't get it angled, I found no way to fix it later without mangling the part. This time 75% of them succeeded acceptably, which was an improvement. I may have used 10x the amount of superglue actually needed, but like I said before, I was getting frustrated with attachments. These started looking like someone's first attempts at welding or something.

This was the first moment I felt like dry-fitting the other three crates on the launcher rack now, the first crate with a rocket loosely inserted. Maybe this was going to be something semiacceptable, after all.

Session VI

To start my session I just bent the remaining long L-irons, again only a part of them went ok, while others ended up being bad on one end. I glued my attempts one by one into the frames using ridiculous amounts of superglue to ensure some results.

According to the instructions there should've been 32 \_/ -shaped support bits glued to hold the long bits and the crate frame nicely and tightly together. This translated into two of those per L-bit. But the whole setup was in such an unreliable state that no piece was exactly where it was supposed to be, so adding some fixed-size supports into spaces that had, let's say somewhat dynamic spaces instead, made no sense.

Following this same train of thought to misery I didn't go and add the same amount of even smaller tiny bits into the rocket engine end of the crates. They'd all been at wrong angles at best, some would've been outside the crates, or otherwise just crapped up. I decided to save time and especially my nerves by ignoring at least 64 detail pieces from my rocket launcher.

Perhaps I should've tried to 3d print these crates at work or something. I just didn't remember immediately if we had resin or filament printers there, as that would've had an impact on the result.


All four crates were quite mishapen but I had some hope for painting to help hiding my numerous uselessness-caused crimes. We'd find out soon enough when the priming (with black) was done.

5.3.25

Launcher's crew assembly

Launcher crew

One out of five guys was already done, the other four were pretty quickly assembled. On each I spent most of the time playing with the arm positions and angles. I didn't have the crates here to help me out. And like I said the last time, painting living things was going to be a pain anyway, so I decided to just build them all up and suffer the consequences with the arms and whatnots when painting. For a change I managed not to borrow problems from the future me :D

Mr D

I chopped off the next set of pieces from the spre, cleaned them up and glued together. The set D gave us a guy who was adjusting something on the launcher frame, maybe he was very careful with screw tightening here.

Mr E

I had the crew leader done the last time, I just wanted to snap a photo from a front angle. Those gaps needed something done on them before any painting was to be done. Of course that sort of activity carried a considerable risk of messmaking.

Mr C

Mid-sprue guy was the part of the pair with the top part responsibility. He either enjoyed his work, or grimaced in pain and/or effort.

Mr B

This guy holding the lower end of the crate didn't seem to be suffering too much, so maybe he had the easier task.

Mr A

Sytytin -> fuze

Last out of the sprue was the chap working closely on something. My assumption was that he was the ammo guy n+1 who was responsible for setting the fuze, and was working on exactly that. Except that the rockets had their fuzes on already, maybe he had the next barrage's first rocket in progress.

The gang's together

Heh, we had a sort of a copy of the cover art already. Only the colours were missing. And the rocket crates, and I had a word about them after the photo.


The photoetch circus

I had actually started this session with the PE as I thought it'd give me a better clue on how much work it was going to be. For one reason or another it didn't start out well, so I switched to the plastics instead. Had I force-pushed forward, I knew I was going to be annoyed and that was never productive. Instead, I left them and my thoughts to stew at least overnight.