Another new approach
I did spoil this operation earlier, as I was airbrushing the guys in preparation for this stuff. There was absolutely nothing new in this in a way, slapchop or slap chop was a well-known method already. I just had never tried the contrast paints, so I had to do something a bit differently. My homebrew recipes also increased the potential problem field, but that was life.
Before starting properly I drybrushed them quickly with white. That was done because my airbrushed zenithal's coverage wasn't as good as what I wished.
The skin colour game
For the first step I rummaged in my collection and looked for my pretty old skin coloured paints, based on the posts I had used them in 2016 on the A-10 and the submarine captain. Both the Vallejo Model Color Dark Flesh and Medium Fleshtone were still in liquid form, and of those I chose the fleshtone. The idea here was to make a filter, which was practically some incredibly thin paint, and apply it lightly on the guy so that the underlying greyscale would provide all the shading and the filter provided the colour.
My first layer of fleshtone (VMC 860) made their faces look more like nightmares straight after painting. I doubted they'd look much better after curing, but the plan was to apply more layers, so I wasn't stressing about this yet.

Leather boots for marching
I was thinking that I was supposed to have a bottle of chocolate brown, but the cats were sleeping on my storage space, so I used some AK Interactive's Mahogany (AK11106) as a substitute. I also wasn't sure if my old VMC paint was even technically countable as a liquid anymore.

Based on one layer it was a nice colour, but maybe Heer wasn't using that kind of boots. So I had to find the chocolate brown that I was absolutely certain I had seen last week.
The next evening I did find my paint (VMC 70872 Chocolate Brown) and I thinned it seriously to give the boots a new, darker, layer. Not that the mahogany first layer was bad under it, I thought. My idea of army boots was always simply black, but I was going to follow the instructions and wiki instead of making crap up myself.

Uniform pondering
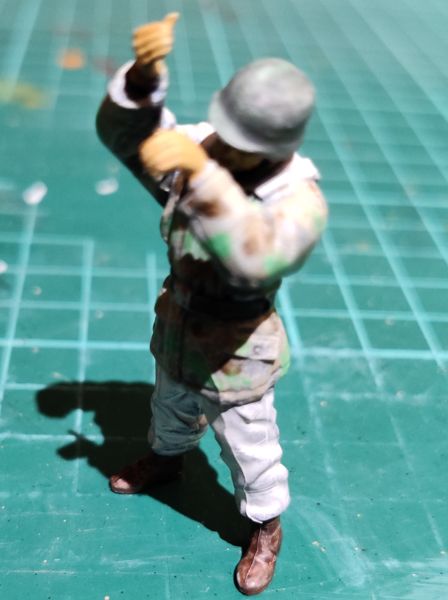
Judging by the seams and padding the outer clothing was quite wintery. I was just thinking that as I started with the bare skin and the fingers looked like hands instead of gloves, they had to be in the Spring side of the winter already, on the last snows of the season. To support that idea I could attempt to give them coats with the snow side turned out, and the pants with the camo side out - or maybe it would be smarter to do the opposite, with the last snows on the ground and the darker treelines with branches above. Any reference images I found constantly showed the Germans with 50/50 with camo pants and snow coats, maybe to make them stand out more.
Doing any kind of a camo pattern with super thin paints was going to be difficult in any case, but if I only had to do that on half the clothes instead of both... This'd be way too boring without any challenges, so that's what I was going to go for.
Winter coat - Splintertarn
I started the painting of the camo side of the winter coats by thinning some Sand Yellow (VMA 71028) very heavily. Then I spread my ridiculously thin paint over the coats and left the white snow sides and the underlying tunics untouched. Either this paint was way too thin or just perfect, time woudl tell. Extra layers were needed in any case.

Before I got any further with the sandiness, I wanted to prove the awesomeness or stupidity of my camo pattern idea, so when the first winter jackets were dry, I thinned down some green (VMC 70942 Light Green). With that paint I drew some shapes straight over the sandy parts without any actual plan.

To get the brown parts I thinned more chocolate brown and kept on with the program.

Based on this first round I felt I thinned my greens and browns a bit too little. The sandy yellow would require at leats another round to be a bit stronger, the others might not need anything else.
Tunics
According to the wiki the M/41 tunic was to be field grey (a grey-green shade), with the collars in the same colour, as opposed to the earlier green collar. There wasn't much more visible than the collars, so it wasn't a big operation. Or so I assumed. I decided to paint the tunics simply with a thinned down green, as I didn't have a perfect colour ready and I didn't trust my mixing operations and especially their repeatability.
Mr B's tunic was the only one this nicely displayed. The others had their winter coats much more tightly pulled shut, but it'd been pretty boring if all five had the same setup. I'd reinforce this part on a couple of guys with a new layer of paint.

Winter coat - the snow camo side
There wasn't much shown of the snow sides of the coats, each guy had their own way of wearing the outfit. Most of them just showed the lapels turned out. so those were the simplest parts to start with. Those, who I decided to give an inside-out hood, got a white hood, and the others didn't have much showing on that end.

Winter trousers - snow camo side 1
When the winter coats were painted and cured, I flipped the guys upside down and started painting pants on them. The first layer was as thin as expected, but still changed the overall look surprisingly much.


Steel helmets
A Stahlhelm was supposed to be grey-green. In a winter situation they were sometimes also painted white, so that would've been the direction I would've chosen, had I not decided to make the bottoms white and tops camouflaged. I decided to mention this here, for some future searches to remind me that yes, I had thought of something at some point. Of course one (or two) of these chaps could have a white helmet just for the fun of it.
I painted the helmets in the same run with the coats, using two coats of paint. For the base of the helmets I used a strongly diluted dark grey (VMA 71048 Dark Sea Grey) and thought that I could top it up with a hint of green. In this first photo below the dented dark grey looked pretty damn nice. This photo was taken after the first go at the winter jackets.

Before painting the tunics I added some of that green on the helmets. Was that a smart thing or did they end up looking more like rain-wrecked and moss-growing relics?

Belts and other details
The belts got three sessions, and after that I was content with them. I could've left the belt buckles as they were, greyscaled already, but I wanted to highlight them better. The main bodies I painted with gently thinned VMA Cold Grey, and then I highlighted the edges and the marking in the middle with a very careful brushing with VMA Steel.


Waffenfarben - or the blocks that showed your branch I painted red for artillerymen onto the collars of the M41 tunics, as far as you could see them and where I could reach with my paintbrush. As this photo showed, my skills weren't good enough for the grey II marks getting amazingly anymore.

First I thought of using the same thinned down paint method for the chin straps, but after the first strap half I decided that just a slightly thinned black worked better. They didn't have the original shading left on their faces anymore, so the benefits of multiple glazes were nonexistent.

The often-looked at wrist watch of the launcher leader got a black basecoat to begin with. When the black paint had dried, I painted the body of the watch with steel.

Finally I painted a black face on the watch, the arms I most likely wouldnt' attempt. The hour markings I most definitely would not even dream of.

Yeah, the next evening I stole a few moments to paint some very thin white lines into the watch face. Now I needed to apply a gloss or satin varnish on it to complete the effect.

Winter trousers - snow camo side 2
At this point I painted the snow trousers (and the coat details) for a second time. This time I thinned my white a bit less than before, the shading looked like it still remained in existence. Now the dudes had a pretty good-looking set of snow gera, of course they wouldn't and couldn't remain pristine in the nature and while carrying soot-crusted stuff and firing rockets around.


Eyes
Getting some facial details on the guys couldn't be postponed forever. Based on some things I had read the eye whites were not important in this scale and viewpoints, so I ought to be ok by just painting coloured dots for the eyes. I picked three colours just for the variety: Goblin Green, Chocolate Brown and Electric Blue. Then I asked the Project Assistant II if she wanted to deal out the eyes and she was more than happy to sort the guys.

I took some immediate closeups when I had painted the eyes and before I fixed the overflows. The photos were awful, so I wasn't going to share them here. To fix the faces a bit I mixed a bit lighter shade from the medium fleshtone, and applied it on the noses, chins, cheekbones to add variety to the faces. Finally I brushed a bit of chocobrown on the mouths and ears to get more shadows in place.
In this latest dry-fit photo the guys seemed like they ended up looking pretty fine, so I could declare them practically done at this point. Of course all weathering was not even started yet, so no worries, they wouldn't be as if they had just come from the laundry shift.

A couple of my guys had lost their helmets at some point or another, and I had quickly just superglued them back so I wouldn't ruin paintings with the thin cement. So I hadn't realized to clean up the overflowing superglue goo, and these two had some weird crap on their foreheads and it was most clear on the watch-watching mr E.
I came up with a silly idea and decided to cheat by painting the glops white and declared them gauze. Boh guys had gotten some shrapnel damage or something of that sort. Maybe they'd both have clean dressings on their wounds or I'd weather them to look disgusting. We'd find out later.
Mr A, setter of fuzes
The greyscale starting point:

The unweathered state:

Mr B, ammo guy 1
The greyscale starting point:

The unweathered state:

Mr C, ammo guy 2
The greyscale starting point:

The unweathered state:

Mr D, adjuster of things
The greyscale starting point:

The unweathered state:

Mr E, launcher chief
The greyscale starting point:

The unweathered state:


