Choosing the colour scheme
The Flanker was going to be a blueish one, as I had already done something else with the MiG-29 (green-yellow).Belly up
Before I started painting I taped the engine exhaust nozzles off to be safe. At this point that was all the covering up I needed, for the more essential stuff was going to happen on the other side, where the potential to ruin other things was much considerable.On the belly side the only colour was going to be a blueish one. I had excitedly gone to my loyal provider to get a couple of airbrusheable paints for this project alone, now I was going to get to try the first one out. Each of the three bottles had markings (AMT, AN etc) before their names that were totally unknown to me and outside my limited area of expertise in aviation. After a quick search I found out that these were what the Soviets used when the Germans had their RLM codes.
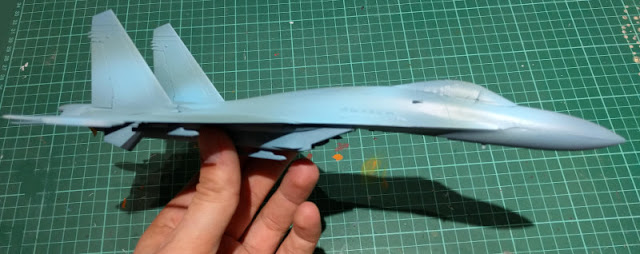
Back to business. I was starting painting the bottom of the plane and everything attached to it. I chose a grey-blue paint for the job (VMA 71318 AMT-7 Greyish Blue).
The painting process was pleasant, quick and easy. I didn't notice shooting paint onto the plane at too short a distance, so I believed I managed to avoid the puddling that's been plaguing my projects on occasion. In the nature, with my plain and awful eyes the blue was of a much nicer shade than what my old phone camera captured, under the led lights.
A reference for the camo pattern
Before getting any further with anything I did a load of image searches for blue camouflage paintjobs on Flankers. Surprisingly many of the results depicted digicamo that could've worked in the context and I know I'd had fun doing that, but I just wanted to freehand it now. The pic below showed a bit of inspiration, not an example I'd slavishly follow. I doubt anyone who's ever made the mistake of reading 'Mumblings got surprised or shocked about this decision. |
| [LÄHDE] |
Basecoating the topside
I had really liked the bottom's blue-grey coating, so I decided to use it as the basecoat for the camouflage on the top half of the plane. The other two paints I was going to use as the actual pattern of the camouflage. Again I protected the engine bits with masking tape before blasting the hell out of my plane.Interestingly these photos, especially the first one, showed the shade of the paint much more accurately than the earlier photos. Now my Flanker was completely sky-blue - for a fleeting moment.
The second colour of the camouflage
To brake the shapes/form a bit I blasted some shapes with another version of blue-grey (VMA 71319 A-28M Greyish Blue). There wasn't a huge contrast between these two paints but they did have some difference at least. This second colour was a bit greener than the first one. Maybe that could've worked as a decent November-ish basecoat.In general I hadn't and wasn't planning the pattern specifically. I wanted to break the form of the plane a bit, which in turn meant that wherever there was a longer part, I added stripe-like areas across it - when there was a longer straight bit, I added some irregular shapes along and over the edges. Now these two greyish blues didn't really give me powerful tools against the form of the vehicle, but not all camo jobs were of the high-contrast type.
The highlight colour
As mentioned, to complement the two main colours (that were to cover most of the surface) were brothers at least, a more standing-out colour was more than welcome to bring some life to the whole show. This task was delegated to a light blue (VMA 71317 All Sv. Gol Light Blue) paint.I didn't want to do large volumes of this bright colour, I attempted instead to attack corners and longer edges that were contrary to the nature itself. Again I went without a deliberate plan, progressing with my gut feeling.


No comments:
Post a Comment