Hull
Evening 1
As always, these things started with the Panzerwanne. Before I could glue in all the sixteen torsion bar arms and the axles for the idler wheels, I had to clean them up a bit to get them glued in. Also the corners in the front - and the bits that glued there had to be scratched clean first. This was the first time I had to be cleaning these up and I was already getting fed up with it.

Maybe you could see from the photos, I did again some enhancing to the flame cut marks on the puzzle piece joints (I knew there was a name for this but I wasn't aware of it). It had been a fun effect on the Jagdpanzer and practice made one better.

Despite the shocked look in the upper part of the rear armour plate it fit in perfectly.

Evening 2
I kept soldiering on and installed the top hull on the Panzerwanne trusting myself in getting the running gear nicely in despite the mudflaps in the front. The jack was not installed yet, but I guessed I had to build and put it in later on. Speaking of the various and numerous tools on a German tank, I was most likely going to leave a good bunch of them off. Or maybe I ought to put them in place despite how I expected the youth to treat the model later on.
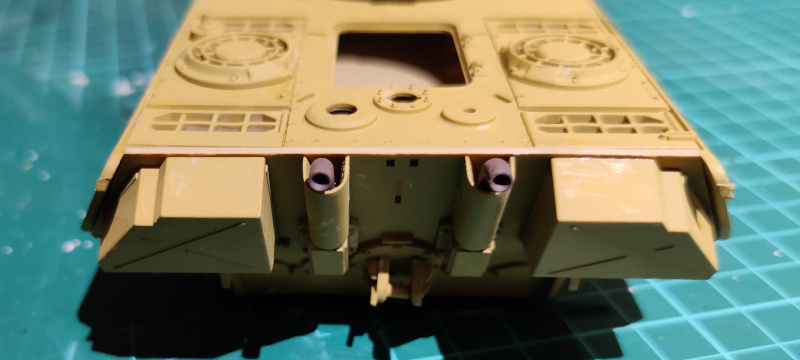

Here we had a couple of piecesets that had been painted white that showed through in unexpected places. It bothered me, but this tank was going to be thoroughly repainted soon anyway so I could ignore the strange choices. On the engine deck I was just missing a few lids and the door, from the front it was mostly just the MG barrel, the gun's travel lock, and the lamp.
Evening 3
Adding more previously missing pieces. The more of those I glued on, the more the previously overpainted glueable surfaces got on my nerves. Just the previous evening I was thinking of skipping the track link holders on the side hull, the tool racks and whatnot. Then I thought that I ought to build it properly so that the Project Assistant II had as dedicatedly built a model as she could.


In any case I was going to superglue the engineering tools and the other tools when the tank's repainting was done. That gun barrel cleaning tool's cylinder was the most worrysome bit, I wasn't sure how much force the paintbrusher was going to apply on these bits...
Turret
Evening 4
The 7.5 cm KwK 42 L/70 was a simple build, again the largest amount of tooth-grinding came from the forced cleaning up of the paint. I also didn't remember Tamiya's approach of using a long screw as the gun's axle.

I didn't spend much time on the gun's operator end, I just glued them together and the cannon itself into the turret. The turret's interior details I didn't build this time, those were mostly the handles on the hatches and the flip-flop seats for the gunner and the commander, and the hatches I glued shut. The overzealous prepainting over 100% of the pieces was a huge detractor again.
There was a thing I wanted to specially mention in the photo above: Tamiya's instructions named many of the components unlike the Zvezda's instructions, for example. At least I liked to know what I was more or less working on, if I didn't recognize the component's name and or function already.
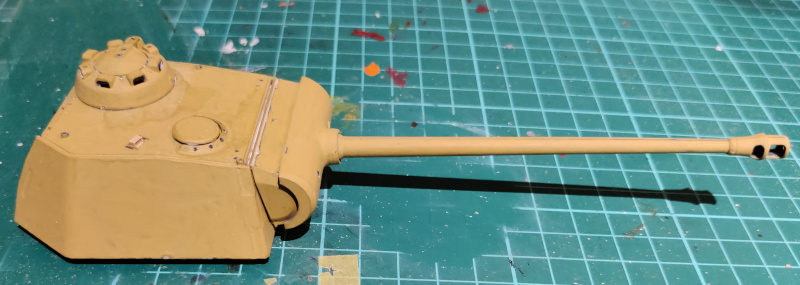
This turret photo showed the upper armour plate on the gun mantlet still missing. Also the handle of the commander's hatch had snapped off, so I had to either find the wandering tiny piece or make a new one from some thin metal wire.
Running gear
Evenings 5 and 6
Now I had this bright idea of trying a new approach to the running gear, it was a simple trick that for some reason I just had never tried myself. I was going to set the wheels in place, then glue them to each other but not on the axles yet, so I could later attach/detach the insanity-inducing wheelset in one piece with the tracks on them already.
First I laid in the four inner road wheels.

Next I used a dot of superglue to the parts where the inner road wheel pair would connect with. The superglue I owned happened to be annoyingly slow, so I had to leave them set for a longer time. Maybe I could've used some baking powder to do this quicker. Maybe with the outer wheels, then.

While these were setting I decided to try if I could make the right side's wheelery a bit quicker by making it a bit more complicated in its own way. In this first set I was mostly worried about the connection between the outer roadwheels, because they didn't touch the middle ones the same way the inner ones did, and I'd just have to glue the inner and outer wheels together in a confined space. So for the other sets I just glued the in-out pairs together so I could just align the interlaved wheel pairs when plopping them in place and together.
[PHOTOS MISSING DUE TO USER ERROR]
Playing with the right side's wheels wasn't a big operation, but while working on them I rememebered seeing someone doing all this with one more change: they left the torsion bar arms unglued from the hull as well. That I could've tried, had I thought of it.
Of course I forgot to take the photos in between, so there were no photos of the roadwheel setup, nor any from the bent-out-of-shape track installation either. Those things had been forced into weird angles by being bound into a tight strange loop with rubber bands that came apart when I touched them. These band tracks just felt too tight always, as they didn't sag on the way back at all, there wasn't much else to say.
No comments:
Post a Comment