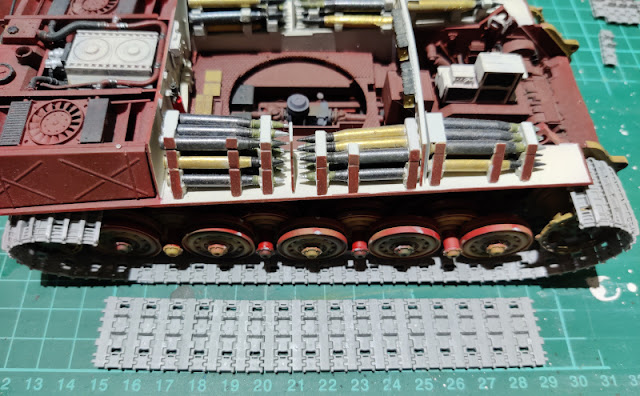
Mastodon

9.2.22

Royal cat-trackwork, part 2

Continuing

After a relaxing break from these things (and an actual vacation) I returned to the track business. In my mind this was going to be pretty simple: a few painting runs per track, smashing them in and... this bit would be done.

The painting process

I primed my tracks with the dried bone. After that I took a few rounds for coating them with flat black, inside and outside, first having them lie on one side, then the other. This gave me a pretty good coverage.

The photo below showed the first session's result with the tracks lying on one side only. One of the tracks split into a few subchunks due to underapplication of glue much earlier. This wasn't an issue, as it made painting a bit easier and reconnecting them was simple.


First weathering

After the final blackening I painted the inner and outer surfaces lightly with brown (VMA 71037 Mud Brown). The goal was, traditionally, to get a nice, lighty dirtyish look.

On top of the brown I drybrushed my goto-metal (VMA 71072 Gunmetal), highlighting the track link edges and the teeth on the inner run. My goal was to get a pretty simple and gentle effect on the bits that were under the most mechanical wear.

Some people have recommended using a pencil on the track links, I couldn't remember if I had tried it, maybe that was looming somewhere in my future. The photo showed how the earlier one piece track had also split in two. Again, not a problem of any sort.


The installation process

The right track

Installing the tracks was a tiny bit worrisome. I started by fixing the tracks into single pieces again with superglue. After waiting for a bit I took the right side track with its drive sprocket, and dry-fitted for safety. As soon as I was certain of my success, I applied glue to the sprocket's axle hole and set the pieces into their places. When the alignments were good, I sealed the track loop with superglue.

The left track

Installing the second track was as simple as the first one, except that this time I had a bit less convenient holding spots for spinning the model around. The freshly installed right track had stolen away the support spots from the opposing side.


The track I had built wasn't optimal, but such was life and the price for not working on tanks in (too) many years. All in all the tank's look changed quite a bit with this step.

Oh, and go ahead and guess if I noticed way too late that I had set this track the wrong way? Yeah. The inner side of the track links were facing outside. Sigh.

Luckily I've never made the mistake of calling myself a good nor even mediocre modeler :D

A topless large cat

Of course I took more test photos. The top hull was something I was not courageous enough to dry-fit on again. I wasn't even sure if I was ever going to do that, due to the fitting issues.


Weathering was just about all that was missing here. What a shame, that my oil stains had dried into their jar.

2.2.22

A sidestep

Missing links

While working on the tracks I wanted to do something else TM for a moment. As a simple thing to try out was a small effect I had not used on serious models. In addition to that I'd also fix the only primer-wearing bits in the road wheels.

Edge highlighting

As you may remember I had washed the whole camouflaged area with brown. The idea here was to use the original camo colours and drybrush those over any raised edges and corners. Simple, nothing that'd jump out weirdly, and if anything stupid happened, undoing would be easy with a bit of wash.

On paper it sounded neat, but with the shades of paint I had used, the difference wasn't really noticeable anywhere else than in the cone in the front of the turret (this wasn't a Saukopf but as I mention the name, you all know which bit I was talking about). Of course I could've used slightly lighter tones, as I had those readily available, but I didn't go there due to the nature of the camo pattern. There was a risk of ruining the pattern and that kept me very cautious.


Next time I'd try a stronger one. Maybe I learned something from this, anyway.

Roadwheel touchups

As anyone with functional eyes could tell, the roadwheel rims and the locking cylinders were incomplete. They mostly had the red primer on them. I decided that those were not camouflaged, as the camo painter had more important and useful things to do, so a plausible basecoat was going to be good. I used the ruling basecoat of red brown with the idea being that it was a corrosion-protective paint.


While I was poking around the road wheels, I dabbed a bunch of flake effects with a piece of a sponge, applying some dark grey (Panzer Dark Grey). The last time I did this was inside the turret, so it was a continuation of the same effect. As gentle damages to the paintjob, they looked neat.

26.1.22

Royal cat-trackwork, part 1

Some road wheelery

It may have been obvious that I left the tracks and friends purposefully (or because of my own stupidity) to the end of the project. Somehow, as a scale tank enthusiast I've felt a tiny bit of shame for having the "erf, here again" moment most often when working on the tracks.

Perhaps one of the reasons for my attitude problem came from the repetitiviness of this stage. First set up and then paint a large number of discs. Then a sick amount of track links need to be queued and glued - twice while you're trying to figure out the best rate of slack, or if the track should be pulled tight instead?

The inner road wheels

I detached all the eight inner road wheels and installed them. Not a single moment of pondering was had to decide which was to go where, as the road wheel camouflage was not planned in any way between the wheels, even less so with the hull.


Outer road wheels

The outer quintet of the road wheels didn't fit perfectly on either side of the tank, completely unlike the inner ones. I didn't want to use force and break anything off, so I thought I'd try to carefully jiggle them in a bit better.


With the wheels on I left them alone for a while. After the gluings had dried I washed the outer faces with brown. The sprue attachment spots you could see in the photos I was going to fix later on.

Locking bolts

I didn't actually know how to call these bits that kept the roadwheels in place. The long ones went in first (4 per side) to lock the inner wheels into their road arms, then the crowns alone (5 per side) to lock the outer road wheels in.


As I had painted the roadwheels and the bolt-things independently from each other, I had a pretty odd mix of them in my hands. I tried to pair them as sensemakingly as I could. A few of them matched their road wheels just fine, some somehow and a couple of them stuck out like a stick in something nasty. Washing and weathering were expected to hide this crime a bit.

Of the long bits I had only painted the tips, not the sides of the cylinders. Those were going to be touched up while I was to paint the outer rims of the road wheels. Kein Problem.

Tracks

Was this the moment where I was going to repeat how assembling the tracks themselves has always been the most uninteresting stage of tank modeling? The rubber band loops never stayed in one piece (or straight), the varying-lenght bits always ended up looking like trash and these individual link tracks took ages and were, like I said, tedious at best.

Once, almost 17 years ago now, I ordered a set of Friulmodels metallic tracks to a Jagdtiger. The vehicle also looked like it was done by me at that point. The tracks themselves were wonderful and weighed almost as much as life itself. Maybe I could try their products with a simpler track type than this. In fact, in my delusional mind I have been dreaming of a new Hummel as I somehow never completed the Dragon models 1:35 one back in the day. Couldn't recall why, exactly, I didn't finish the painting.

Metallic Friul tracks for a Jagdtiger being built in 2005
📷 2005 CE

I also haven't still found the optimal (for me) way to assemble the tracks. Most typically I've just laid them out, glued, connected the loop and slapped the thing on while still posable, and left the painting to be done in situ.

An implementation idea

This time I felt like trying someting else: I'd at least assemble the ground-hugging straight parts separately and let them dry completely. Then, while fighting the schedule, I'd try to get the rest of the track done before the glue sets, and get each track in place with the assistance of unattached drive sprockets. There the track could find its shape.

Because the whole setup could be popped out by taking the drive sprocket out as well, it could be calmly painted without a worry. After all the paintings were done and paintjobs dry, the reinstallation should be as simple (or swear-inducing) as detaching, and gluing the first and last track links together would be child's play.

The assembly process

My King Tiger's tracks came in two bags: track links in one bag and their connectors in another one. Judging by a quick dry-fit, they did fit together pretty nicely.

My first assembly session didn't offer much time for the tracks, which meant I got almost the full first ground lenght done. Like I was thinking before, I let this to dry flat. At this point I was thinking that maybe I'd improve my chances by assembling four of these straight runs: two against the ground, two slightly longer bits for the return trip. Then I could do the curvy drive- and idler ends separately.

I really couldn't believe that I would have the time during my hobby time to build a full track, not to mention two. The glue's drying time set tightish limits to how slow I could be in my doings. The more I could decrease that risk by spawning subassemblies, the safer I was going to be. That'd take more time, of course, but maybe the result would be better and my nerves less ruined.

Front loops and the left track

To get the first run done I measured roughly, how many links were still missing from the bottom straight. I extended it by about half a dozen links, which got my ground-touching track part to cut at the center points of the frontmost and rearmost road wheels.

The next track stage I started working on by laying the idler wheel curves. I pulled the "five links" count from my hat and after the glue had cured a bit, I laid the runs onto the idler wheels. Maybe they could've been a link shorter each.

While the curve was setting into shape, I assembled the short straight bit that connected the curved part and the ground part. Eyeballing I set a three-link run and the connectors


My guess seemed decent, because if I had made te curve shorter the track would've been set at an unnatural edge (I had done those, too, in the past), here the arc could've been a bit shorter. Or maybe I was going to hopelessly build a track that followed the wheels tightly. That was quite unlikely.


The rear loop

For the idler wheel's loop I made a shorter run and set it to dry onto the idler wheel. At this point I still could play a bit with the lenght of the rising rear track part, using it to affect the rotations of the idler wheel and the drive sprocket.

At this point the track of mine seemed pretty decent. The rear loop could've been a tiny bit longer, even, so both loops would've descended nicely towards the road wheel for the upper half of the loop.

This is the very unscientific way I measured the lenght of the remaining track, by measuring against the gap. Someone smart may have noticed what my mistake was (again).

Repeat on the right side

As usual, implementing the second copy was powered by (relative) familiarity and getting up to speed. Of course I had prepared a couple of bits for the right track while working on the left one. Now the measures were pretty much known and as I have said many times, getting started on these made the progress actually pretty rapid.


They didn't end up identical, the lower one here looked better in my opinion, but maybe they'd both be acceptable. Neither of them was locked into one piece, the unglued connections were behind the drive sprockets.

19.1.22

Tactical markings

Washing with brown

As even the fixes of the camo pattern were done, it was the time for a wash. On this model I chose brown as the most fitting one. I used Vallejo's brown (VMW 76513 Brown), starting from the cannon's barrel and the turret. On the lower hull everything but the bottom (and obviously the inside) got washed. For my own conveniene I left only the engine deck unwashed so I could hold on to something else than the turret ring, just in case. This time my documentation only showed the "before and after" moments with the turret washed and the upper hull waiting for its turn, to display the difference.


Tactical markings

So far I had really painted just the nationality markings, maybe some numbers and only once the unit markings (M-10 Achilles) and that was about 12 years ago. Maybe someone else but me remembered that I had ordered some stencils a few years ago and that I had never had the chance to try out as I was always working on anything but German tanks.

These three packets of stencils (I just checked, I had received the package in early November 2016) offered Balkenkreuze (22 different ones!) and such, and some Wehrmacht and SS markings. Now I started getting annoyed for not ordering the numbering stencils as well. Apparently I had a tightwad moment, yet again in the wrong place and at the wrong moment.

Method 1: sponging

This was the most complicated thing so far: choosing the markings used. A large char 'G' told us that this was a member of Guderian's PANZERGRUPPE. The upper right corner's parallelogram with a char 'S' inside it told that this was a so-called heavy tank, in case it wasn't obvious already. Finally the upper left corner had a bar graph that someone had chosen as the marking of 1st SS Panzer Division LAH.

I felt lazy and didn't want to set up my airbrush for three silly little things (considering both the surface area and the amount of paint needed), so I thought I'd be smart and dab the paint on with a sponge. That could also provide a nice imperfect or partially worn-out effect, I thought.


Otherwise the idea was nice but with such small pieces like these (especially the one for a heavy tank unit) more pressing was needed than was healthy. The stencils didn't prevent any leakage, allowing the paint to go over the edges everywhere. Re: the photo below, taken just before I repainted the glacis plate.

I really should have learned to consider myself crafty :D


Redo

Being my paranoid self I covered up the rest of the upper hull with wide strips of (awfully bad) blue masking tape that didn't really want to hold on to itself, less so onto anything else. I redid my camo, starting with brown, continuing with green and wrapping up with dark yellow. A quick and fine fix.

Before a new wash was to be applied I was going to paint the previously chosen markings onto the hull. The heavy tank and Kampfgruppe ones with black, the divisional one with white.

Method 2: airbrush

Balkenkreuz #1

I spent some time pondering on which of the 22 blocky cross options I would put onto the turret's side. Perhaps surprisingly I didn't choose the largest, but a step smaller one. As the position I chose the rear end of the turret, as I didn't want to try these out on a curved surface on the first run.

Before anything else I taped on the positioning piece, a straight-angle piece that would help aligning the actual stencils.

Getting into the proper business I set the corner stencil into the place. This would give me the white inner corners of the cross. I felt a bit overcautious with the masking tapes, but I also could've added some more on the sides, just in case.

I believe I was a bit too generous with my white (VMA 71*** Insignia White). A smaller volume could've done the trick, I just wasn't entirely sure how good my airbrushing angle was so I was playing it safe, or so I thought. This just risked a tiny paint escape.


As soon as I dared I tore off the masking tapes. That ended up looking pretty decent! My biggest problem was to keep the position aid in place, as my taping order had been suboptimal.

I allowed the paint to cure some more, before I slapped the stencil 18B onto its place and taped in tightly. So far this had to be the most exciting moment in this process. As my paint I used a simple flat black (VMA 71*** Black).


Like before I waited for a bit before undoing the stencil. Perhaps I didn't need to wait that long, I'd try a quicker pace the next time.


Himmel, it was a success! Very gentle drops were ok for me and this looked so much better than mutilated waterslide transfers.
 

Now I was left pondering how many crosses my tank actually needed and where would they go? One would be naturally on the opposite side of the turret, perhaps one could go to the rear armour plate. The turret's top might need some sort of a symbol to keep the trigger-happy air farce folks in check. In case there were any friendly pilots around anymore at the point when this tank was roaming in mud, that is.

I wasn't quite certain if I wanted to add Balkenkreuze to the sides of my tank, it somehow felt a bit redundant on this vehicle. There also wasn't that much space on the rear plate, so that wouldn't help much.

The rest

On the right side of the turret the paintjob went just about as nicely as on the left side. My positioning didn't necessarily hit the exact mirrored coordinates, but that happened to me with the decals too.


My front triplet succeeded pretty nicely, except for a corner missing from the 'G' (the stencil had a shred of something stuck there, that I had not noticed in time). The heavy tank symbol didn't show too clearly with the naked eye, having a small symbol and a rough surface weren't optimal. Also, painting black on dark brown might have been a rather silly idea.
 

All in all these stencils were nifty based on this first try. I started getting excited about what I could do with these in the future. This tank wasn't going to receive more markings, I decided, to keep it from becoming overloaded with crap.

Then again... The barrel could take a couple of victory rings.

[re]Washed with brown

My freshly repainted front glacis plate with its lamp had to be rewashed, so that's where I started. Applying a wash was also going to bring down the contrast a bit, which was pretty bad news for the heavy tank symol.


Washing the rear deck didn't take much time. While I was at it I also retouched a couple of the side walls behind the engineer tools. Finally I washed over the tower's Balkenkreuze.