Washing with brown
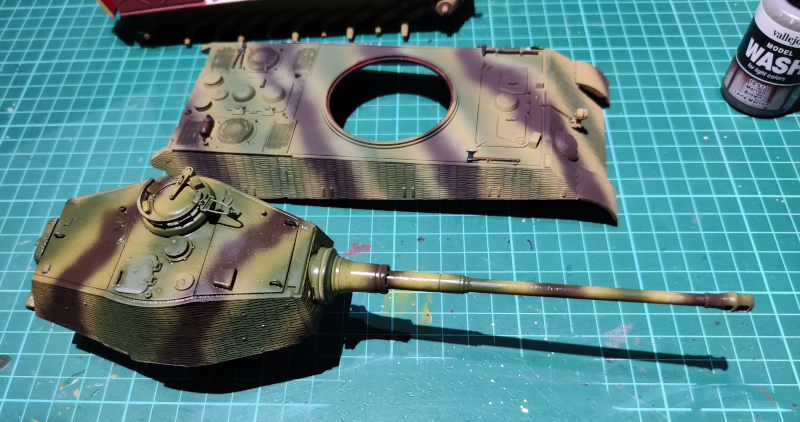
As even the fixes of the camo pattern were done, it was the time for a wash. On this model I chose brown as the most fitting one. I used Vallejo's brown (VMW 76513 Brown), starting from the cannon's barrel and the turret. On the lower hull everything but the bottom (and obviously the inside) got washed. For my own conveniene I left only the engine deck unwashed so I could hold on to something else than the turret ring, just in case. This time my documentation only showed the "before and after" moments with the turret washed and the upper hull waiting for its turn, to display the difference.

Tactical markings
So far I had really painted just the nationality markings, maybe some numbers and only once the unit markings (M-10 Achilles) and that was about 12 years ago. Maybe someone else but me remembered that I had ordered some stencils a few years ago and that I had never had the chance to try out as I was always working on anything but German tanks.
These three packets of stencils (I just checked, I had received the package in early November 2016) offered Balkenkreuze (22 different ones!) and such, and some Wehrmacht and SS markings. Now I started getting annoyed for not ordering the numbering stencils as well. Apparently I had a tightwad moment, yet again in the wrong place and at the wrong moment.
Method 1: sponging
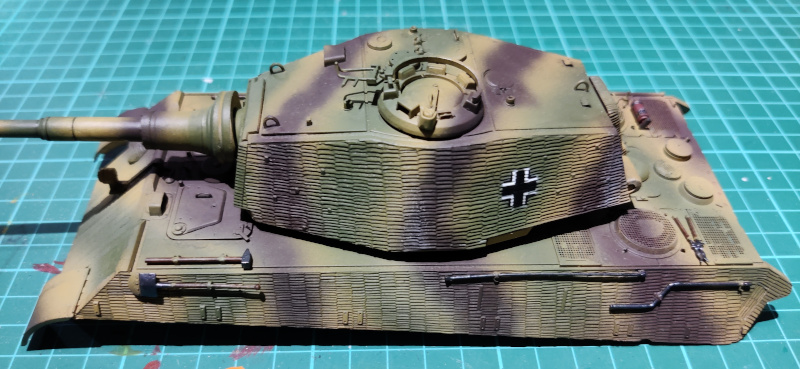
This was the most complicated thing so far: choosing the markings used. A large char 'G' told us that this was a member of Guderian's PANZERGRUPPE. The upper right corner's parallelogram with a char 'S' inside it told that this was a so-called heavy tank, in case it wasn't obvious already. Finally the upper left corner had a bar graph that someone had chosen as the marking of 1st SS Panzer Division LAH.
I felt lazy and didn't want to set up my airbrush for three silly little things (considering both the surface area and the amount of paint needed), so I thought I'd be smart and dab the paint on with a sponge. That could also provide a nice imperfect or partially worn-out effect, I thought.

Otherwise the idea was nice but with such small pieces like these (especially the one for a heavy tank unit) more pressing was needed than was healthy. The stencils didn't prevent any leakage, allowing the paint to go over the edges everywhere. Re: the photo below, taken just before I repainted the glacis plate.
I really should have learned to consider myself crafty :D

Redo
Being my paranoid self I covered up the rest of the upper hull with wide strips of (awfully bad) blue masking tape that didn't really want to hold on to itself, less so onto anything else. I redid my camo, starting with brown, continuing with green and wrapping up with dark yellow. A quick and fine fix.

Before a new wash was to be applied I was going to paint the previously chosen markings onto the hull. The heavy tank and Kampfgruppe ones with black, the divisional one with white.
Method 2: airbrush
Balkenkreuz #1
I spent some time pondering on which of the 22 blocky cross options I would put onto the turret's side. Perhaps surprisingly I didn't choose the largest, but a step smaller one. As the position I chose the rear end of the turret, as I didn't want to try these out on a curved surface on the first run.
Before anything else I taped on the positioning piece, a straight-angle piece that would help aligning the actual stencils.

Getting into the proper business I set the corner stencil into the place. This would give me the white inner corners of the cross. I felt a bit overcautious with the masking tapes, but I also could've added some more on the sides, just in case.

I believe I was a bit too generous with my white (VMA 71*** Insignia White). A smaller volume could've done the trick, I just wasn't entirely sure how good my airbrushing angle was so I was playing it safe, or so I thought. This just risked a tiny paint escape.


I allowed the paint to cure some more, before I slapped the stencil 18B onto its place and taped in tightly. So far this had to be the most exciting moment in this process. As my paint I used a simple flat black (VMA 71*** Black).


Like before I waited for a bit before undoing the stencil. Perhaps I didn't need to wait that long, I'd try a quicker pace the next time.

Now I was left pondering how many crosses my tank actually needed and where would they go? One would be naturally on the opposite side of the turret, perhaps one could go to the rear armour plate. The turret's top might need some sort of a symbol to keep the trigger-happy air farce folks in check. In case there were any friendly pilots around anymore at the point when this tank was roaming in mud, that is.
I wasn't quite certain if I wanted to add Balkenkreuze to the sides of my tank, it somehow felt a bit redundant on this vehicle. There also wasn't that much space on the rear plate, so that wouldn't help much.
The rest
On the right side of the turret the paintjob went just about as nicely as on the left side. My positioning didn't necessarily hit the exact mirrored coordinates, but that happened to me with the decals too.


All in all these stencils were nifty based on this first try. I started getting excited about what I could do with these in the future. This tank wasn't going to receive more markings, I decided, to keep it from becoming overloaded with crap.
Then again... The barrel could take a couple of victory rings.
[re]Washed with brown
My freshly repainted front glacis plate with its lamp had to be rewashed, so that's where I started. Applying a wash was also going to bring down the contrast a bit, which was pretty bad news for the heavy tank symol.

Washing the rear deck didn't take much time. While I was at it I also retouched a couple of the side walls behind the engineer tools. Finally I washed over the tower's Balkenkreuze.


No comments:
Post a Comment