Mastodon

23.3.22

Finished: Project IV/21

Henschel und Sohn & Krupp: SdKfz 182

My first Panzer project in many a year in general, my first tank project ever with a modeled interior. To compensate, this wasn't my first King Tiger, not with the proto- or production turret, not in this or a smaller scale. But this definitely was my longest tank project ever and you could tell by the amount of photos taken and the number of posts typoed up. All this took almost a full year in the calendar, but I did do other things every once in a while, as always, so this wasn't quite as slow as it may have sounded like.


For some reason the tank didn't have a ridiculously large and bright Henschel sign on it, this one above was from a side of a locomotive. Its scale I had completely forgotten.

Panzerkampfwagen Tiger Ausführung B

Before anything else, I took some photos of what I had just finished. I didn't want to break anything before it was documented. The previous times I attempted to connect the upper and lower halves, something made very ugly and scary noises, a few pieces fell off and some paint got seriously scratched. That wasn't anything a modeler enjoys hearing or seeing, you might find yourself agreeing with me here.

A summarizing attempt

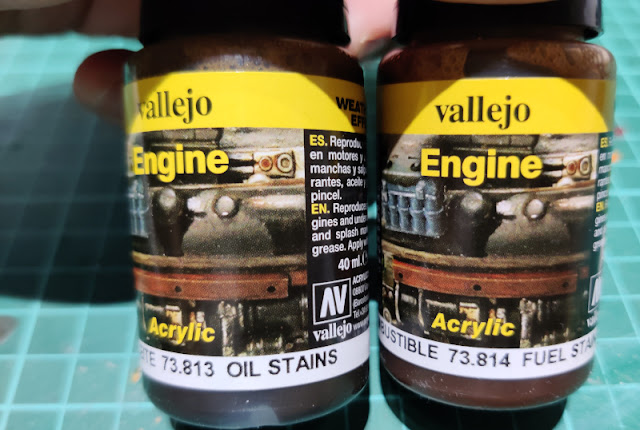
All in all this project took about nine months of time, 41 posts if this one was included, and 502 photos (of which 13 were reference photos), and at best or worst a couple of dozen of tabs open for who knows what sort of weird details for this build. I didn't start counting the paints and paintlike products, as I had just packed them away yesterday evening, but the volume of bottles was noticeable.

Ignoring a couple of fitting problems the Takom kit was neat, I liked building it quite a bit. My current queue is long enough for a year, easily, but at some point I'll be looking for a new tracked vehicle to be built. This kit's completely modeled interior was an intimidating aspect to begin with, but as it was also immensely interesting stuff to work on, I'd be more than happy to jump into something similar again. Sadly, I don't think not too many people besides me were going to be running for a Hummel with full interior, for example, but I'd love one.

A cool kit, with a stupidly badly fitting deck. My own suckiness at this craft prevented me from noticing and working around it in time.

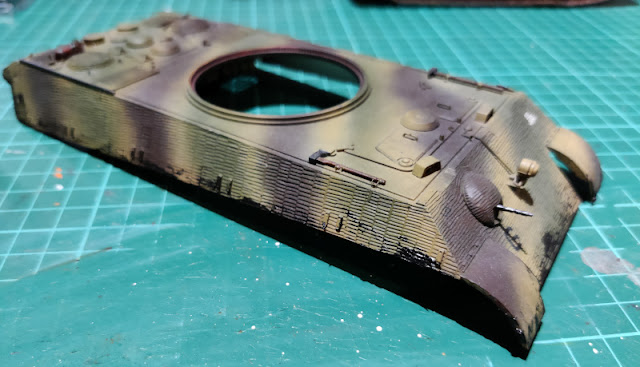
The upper hull with the turret

These photos didn't betray the silly little detail of the deck plate that contained the driver's and radio operator's hatches was removable. Technically I could've pulled it off and take a couple of photos of the cramped insides, if I managed to get the lights set properly.


So far the beast looked pretty decent.
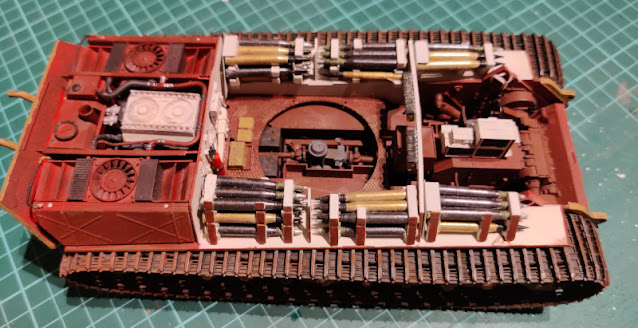
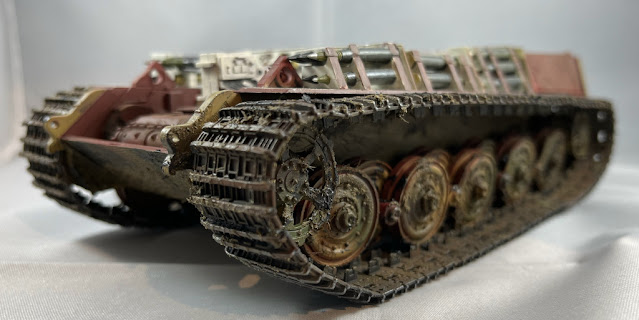
The lower hull

I had taken a ridiculous number of photos of the lower hull throughout the project. Now I took a handful more, to be shared at a slightly higher resolution.


The production turret

Just to cover everything, I took some photos of the turret alone. This was the first time this made any sense, as this was the most complex turret so far (the T-35 ones were a tiny bit simpler). I hadn't really taken photos of the turret since I got it supposedly finished.


In hindsight I could've painted the outer shell and the base of the turret together. Now the base plate was a separate Dunkelgelb block that happened to be located under dark green stripes on both sides of the turret.

The turret on the tank

To waste a bit more time before the risky attempt I dropped the turret into its place on the hull and took even more photos from various angles. Having the tank set up this way the effect was a bit strange. This gave me (again) the idea that I could still take me sidecutters and hack the setup into a "Incredible cross-sections"-book kind of a thing. But if that was my plan, I'd made it clear from the beginning instead of pretending to come up with at the last moment.


Assembled

Now that I had taken all the photos I thought I wanted, I crunched the parts together. In the rear hull the fitting issues were the worst, and I didn't dare to start using any more force than what I had already applied on the poor model. I was expecting the ammo racks and the fuel tanks to crack off, if nothing else. And I really didn't want to ruin those.

So, the photos ended up showing a slightly grimacing front glacis plate join, and a completely open rear plate. No amount of manipulation would've gotten them settle nicely in place and any gluing of such effort would've ended up looking monstrous.


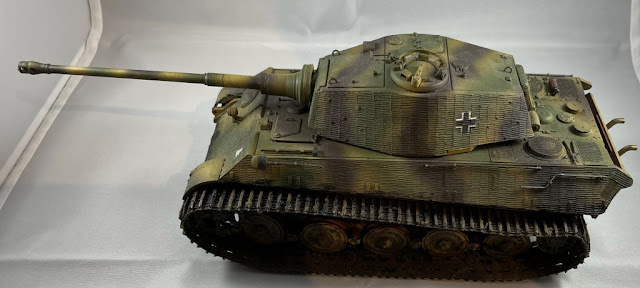
If you managed to ignore the open butt-plate, this was a pretty cool-looking tank. Looking at this at this point didn't make me really wish I had actually used the mudguards and side panels, even though they'd hidden an amount of these fitting issues. A good bunch of years ago I built a King Tiger with a part of them in place only, and those installed were somehow mistreated, providing a nice effect. Perhaps I could do that to a follow-up model, I guess I couldn't be expected to use all the silly tricks in a single model / project.

Comparison kitties

Just for the fun of it I took the Panther Ausf. G (the one that ran on a single AA battery (said battery had finally released its charge, two years ago it still had enough juice to move tha model over the domestic obstacles)). Being close relatives I thought they'd be a fun couple for side-by-side shots. My fresh royal tiger just happened to be clean, while the Panther had managed to gather some dust over it.


The felines had a clear size difference. Some genious had decided, decaudes ago, that these vehicles had to be propelled with the very same engine, expecting somehow similar results. The wisdom of this wasn't too clear to me.

16.3.22

Extra weathering

A last moment sequel

Last week I was pondering whether my grass-mud goo (VW:Environment 73826 Mud and Grass) was still useful or not. Surprisingly it was, so I added some of that around the road (and other) wheels, the outer sides of the Panzerwanne, lower front glacis plate, and of course, the rear of the tank.


Now my project was in its final moments. I just really wished that I wasn't going to destroy anything uncancellably when attempting to attach the halves for the last time.

9.3.22

Weathering effects

Benzine and motor oil

I started my testing with the gasoline spills (VW:E 73814 Fuel Stains). The best starting point, I figured, was the rear deck's fueling cap's base. Hans had apparently been somewhat careless.

Of course, the outer deck being nasty mean that the engine compartment also had to be nasty around the same pipe. This stuff looked disgusting, just like it was meant to be.

After the fuel stains I applied some oily stains (VW:E 73813 Oil Stains) around the cap of the smaller tank I had expected to be some sort of an oil tank. There and nearby. Hans really hadn't done his work carefully at all. Or maybe they got shot at while he was trying to get something done?

Then I added the same oily mess around the axle's joints and to the whateveritwas-machine below the turret. A few of these stains and spills got applied to the bottom of the hull and those boxes, because they added a bit of story to the otherwise clean setup.


Someone had oiled up the driver's pedals or rather their hinges pretty liberally. Maybe the driver had been kicking sand all around while using his hatch, so the oil may have been sorely needed.


Had I not sealed the turret up ages ago, I'd used this wonderful effect inside the turret as well. But as I had, I couldn't, so this is where we were left.

Muds

The more unusual weathering product for me was the thick mud. I had used a similar goo, the "mud and grass" in the T-35 project a few years ago, maybe I ought to check if that gunk was still alive and useful. I was absolutely sure it'd work fantastically with these other mud types.

Upper hull

The nastier mess-making got started on the upper deck, with the black mud (VW:Thick mud 73812 Black Mud). What the instruction sheet suggested for a most natural spray pattern was to blast air from an airbrush into a mud-loaded brush. Sounded cool, but this time I hadn't enough time to set up everything this required.


In addition to the bottom edge of the upper front glacis plate I mostly concentrated on the rear edges of my tank. The sides got a much lighter mud load, despite this unit missing the overhang plates.


Lower hull

My King Tiger's lower hull and the track setup got first a healthy amount of euromud (VW:Thick mud 73807 European Mud), and some black mud here and there randomly applied. As if there was some lighter and more dried up goo, with some fresher and wetter goo on, and beyond it.


The amount of crap I applied was a bit random and mostly unplanned. To be honest I had also not  researched how especially the track-touching surfaces of road wheels collected and removed mud.


Yet another dry-fit

Over all, the tank was pretty much done now. In case my grass-mud crap was still useable, I'd add it to a couple of tactical spots. Then, before my last attempt of attaching the top hull with the main body I'd take the final photos for documentation purposes.


If my attachment attempt worked, despite all my very reasonable doubts, the project that started in May 2021 would be finished, about ten months later. In case that someone was interested in silly details, this was clearly my most heavily photographed project: the last photo above was #423.

2.3.22

New products in the pipeline

Right after the solstice I got a gift: a set of Vallejo's mud & puddles weathering effects. I really hadn't considered making a diorama for my King Tiger (the hull fitting issues alone dropped any fancy ideas from my mind), so I wasn't going to apply them all now. They'd get to be in a project soon enough.

At some point late last year I had ordered a couple of weathering effects for the engine room. I had grumbled about my oil stains gotten ruined in an earlier post. Now I had more coming in, accompanied with some fuel stain liquid.

Now, a couple of months later the bottles had finally arrived. I started messying up my tank even more the same evening. Cackle.

23.2.22

Weathering with pigments

Dusting

My weathering got started by picking through my pigment containers and choosing the ones that felt the most fitting ones. From the Tamiya Weathering Master set's triplet I chose sand, as my tank's inner floors would have some sand (not light sand nor mud) on them. This small box with three pigment tablets also contained a two-headed applicator, one end had a brush and the other a small dabbing sponge. During a good bunch of years the sponge had gotten dry and on the first careful poke half of it was lying in crumbles on the cutting mat. So yeah, that one wasn't going to be useful.

From the Vallejo Pigments series I chose some rust (VP 73118 Fresh Rust), burn umber (VP 73110 Burnt Umber) and black (VP 73116 Carbon Black). To get all of this to stay on I'd use some of their binder (26233 Pigment Binder).

Ages ago I had bought a set from AK Interactive, specifically for this kit, and I chose a couple of products from that packet. I had to skip the engine oil and track wash, as they were enamel-based and I had no handy products to clean my tools after those). Instead, I picked Dark Steel and Track Rust pigments to try them out.

Blackness

Easy targets first: I begun by applying carbon black to the muzzle brake, the exhaust pipe ends and as I thought of it, also on the rear deck's I/O vent grilles. Perphaps black wasn't the perfect option, but I felt it'd work nicely if applied lightly enough.


Sand

My sand cakes got spread mostly to the turret basket's floor and wherever my crew stomped around with their boots, such as the combat compartment's floors. My story was that the Jerries just made a mess of their otherwise cleanish tank.


At this stage the binder liquid was still wet, as you could tell by the photos. The results would look much better in a short while.

Track rust

Ignoring the most obvious use case suggested by the product's name I also applied it inside my tank, not just gently on the tracks. There were so many red-brown areas and I wanted to give them a bit of an effect that was something else than very visible dirt. I also applied this stuff a bit more heavy-handedly onto the heat exchangers, as they were a bit more subjected to the elements.


The track part of the track rust I could've concentrated more into the grooves, had I had a better tool available when I did this.

Steel powder

There weren't too many surfaces I could think of for the dark steel powder. To try it out somewhat safely I applied it onto the teeth of the turret ring.

That didn't look halfway bad so I proceeded to a bit more noticeable area: to the turret. My first clear place was the commander's machine gun rail. In addition to that I also poked some of this powder to the lifting loops and the corners of a couple of the hatches.

Finally I used some of the steel powder onto the edges of the tracks. I thought that'd compensate a bit for the rust pigment that had covered some of my earlier drybrushed gunmetal highlights.

The very next day

First thing I did the next afternoon was to take a few photos to record the state of the set pigments, as they didn't look too convincing in the in progress photos. Especially the gently sandied surfaces looked much better now. Also the effect on the red-brown areas was nice.


The King Tiger's tracks were the absolute main weapon in the set of my weathering attempts. I felt they were very successful.


As said, I was working on these while waiting for the other effects that were being delivered from some corner of brexitland. The transports didn't seem to be in any sort of a rush, that was certain.

16.2.22

Deficiencies

Jacked MG

I had managed to leave the tank's jack to gather dust for who knows how long. The same way the radio operator's machine gun had been waiting for its installation for months already. Now, with the tracks finished, and while I was waiting for some fresh weathering materials, it was the time to get them finished.

My own reference photos

As a little background story: in an earlier world (Spring 2019) we visited the Asturias railway museum. Among all the other stuff, heavy machinery maker insignia and whatnot I spied a couple of jacks. Of course I took some photos with the proper camera, for obvious reference purposes, and for quickness I shot a couple with my phone. I really couldn't imagine it was going to take this damn long to get to use them.


These little things were pretty much the same as the tank jacks (I had never seen one of those live, so I thought these were possibly same, or at worst similar enough), so I thought that using these as source material I couldn't go way too wrong. Perhaps a fresh unit didn't need to be that rusty, though.

Copykittying

The jack I had assembled and primed a long time ago, and then forgotten it. First I painted both ends with gunmetal, then the rest with metallic black. As soon as the paints had dried, I drybrushed a bit of rust colour in various parts, the idea behind it being that some of the dents it had received were deep enough to expose the bare metal to the elements. I also drybrushed the edges and boltheads with gunmetal, to give the eye something to catch onto.


Again, as soon as the paints had dried I set the attachment brackets over the jack. This bit of dry-fitting revealed the correct places and I glued the brackets into the bottom end of the tank's rear armour. That's where it would be getting the hits and dents, while reversing over rocks and whatnot.

Ratatatatata

Due to a couple of fitting issues I had not glued the radio operator's MG34 in place. Now I glued it in for good. A little detail I had ignored to paint and that was the tip of the machine gun. I hadn't been eager to ruin the neat mini model with my amateurlike drilling. The machine gun's aiming was pretty much "straight ahead", I didn't want it being on the way any more than absolutely necessary.