Mastodon

8.6.22

Washing the default Star

Wishy-washy

My paintjobs were so amazingly beautiful that I almost felt bad to start the weathering process. 

Again I was going to try out another mr Savage's hobby hints. Instead of carefully applying limited amounts of washes and letting them be, I was going to apply a good amount and then wipe off most of it. Done by a real pro it looked fantastic, I wasn't expecting mine to end up anywhere in the same universe.

Vallejo Model Wash 76518

I skipped the old and most likely mostly dried up Citadel's black wash (couldn't remember which one had been too thick years ago already), instead I took Vallejo's black one out. A perceptive reader may have noticed that I've been working in a kind of an assembly line way throughout the project, always starting with Timber Wolf. Now I applied a healthy amount of thin, black paint onto all the places that I wanted to darken compared to the surroundings.

As soon as I had iterated through all the holes and vents, I used a piece of kitchen paper to dab off most of the paint, running in the same order than I had painted.  The interim result was darker but not as overpowering as the freshly applied black wash in the previous photo (it'd calmed down a bit while drying, but still).

Following the same principle I went through the rest of the units. I mostly darkened any and all vents, Heat Sink -like bits and other joints. Whatever looked most like it would benefit from darkness, got it. Each of the gunmetal surface was included on this list.


I quite liked the subtleness of the effect, this was going to remain in my toolbox. Thanks again, uncle Savage!

Vallejo Model Wash 76512

To improve the camouflage pattern, I was going to do another washing round, this time with Vallejo's green. This time there were more and larger surfaces to treat, so I decided to work subsection by subsection. First victims were the Timber Wolf's CT and head. The difference was pretty noticeable, both in shade and the panel lines.

Again I took off most of the green wash with the kitchen paper, what remained, remained on the mini. The result on the mini's surface was much more gentle.

As a whole the Timber Wolf looked better, even though I couldn't say directly how it actually differed from itself about ten minutes earlier.


Like before, I followed my path: first applying the wash on a part or two in one go, then immediately wiping off the paint. I didn't take photos of all the parts and stages, as I felt that for process documenting purposes these were more than adequate.


Washed vs unwashed

After this one session I had three 'Mechs and one Elemental Point ready, two 'Mechs and the other Elemental Point waiting for their turn, providing something to compare to. Here the effect of my mostly removed green wash showed quite a difference after all. A positive difference, I might add.


Wrapping up the insignia

With the washings done and dry, it was a good moment to finish up the Clan insignia. The first bits were the sword-grasping talons for the Falcons, then the beaks. Each painted with the same yellow (VMA 71033) that I had used before.


Blackness

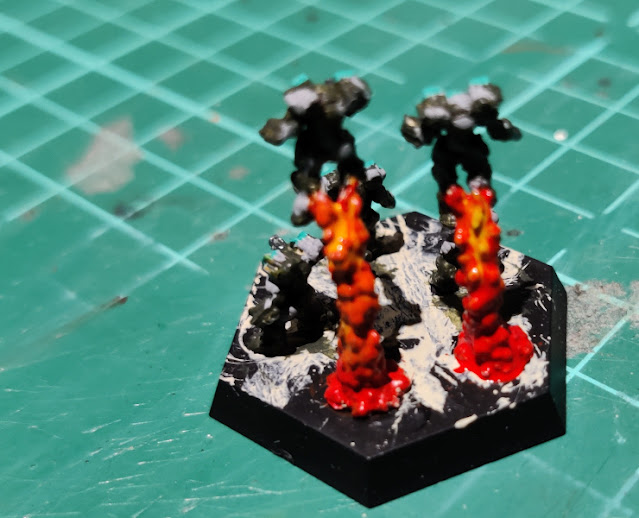
Something had remained bothering me in the rocket plumes. I took some black and drybrushed it gently, especially to the oldest and outermost, the most cooled down parts of the expanding fireballs. Maybe that improved them somewhat.


While drybrushing I attacked the Executioner's Gauss cannon to look a bit less fresh, even though I knew perfectly well that it had no reason to look sooty. In my opinion the barrel just looked too clean and fresh.

My experiments in this project had gone disturbingly well, so I felt brave enough to try out something else the next time I painted. It was only an Executioner, after all, nothing cool that could be ruined with a silly mistake.

Group photo n+1

Yet another WIP group photo to celebrate a finished stage. Progress was quick and enjoyable.


1.6.22

Insignia for the default Star Mechs

Tiny details

I was going to approach the various insignia like I did earlier, years ago. The markings would be simple and ok enough from a distance, not so much at a closer inspection.

A note about the photos in this post: they'd be cropped much tighter, as I got bored with all the photos in this project being taken from always the same exact angles and distances. Looking at things so very close was maybe going to ruin some of the look and feel, as in real world these'd be ogled at from a greater distance.

White planets

Both the Cluster and its parent Galaxy insignia were based on whiteish circles, and something overlaid. For that purpose I painted white roundish spots into each leg of each of the 'Mechs. These were done freehand, so at this scale and size maybe blobs or lumps were more accurate descriptions.


Shadowing the Cluster insignia

The description for the 3rd Falcon Talon Cluster's insignia contained "shadowed white world"  so I thought I'd attempt to blend a bit of light grey onto the white blobs. That didn't work, my whites had gotten too dry for blending.


Galaxy Falcons and Cluster claymores

Over the Galaxy spheres I painted a jade green something that was supposed to look like a Falcon in air. The Cluster spheres I impaled with jade green swords. Truth be told, there was no way I could make a difference between a claymore, rapier or a gladius in any art form. So, whatever I did I called a claymore. This was then repeated five times, again the result looked better from a greater distance, as opposed to from 5mm away.


Clan base

To create the Clan insignia I was to make a thing that reminded me of a belt buckle. I've had the habit of painting those with light grey (the same I've used for drybrushing the greys of the camouflage). These ended up looking better on those OmniMechs that had a larger surface area available for painting, such as the Timber Wolf, Executioner and Adder, and worse on the chests of Nova and Grendel. I had chosen my limitations myself by highlighting the things I highlighted.


Falcon shapes and swords

Obviously the most important part of the Clan roundels were the Jade Falcons with the Katana-like swords clutched in their talons. The birds have always been more or less the same V-shaped things or 90° rotated curly braces. The steely blades and black handles ended up being a bit too large, I thought, but maybe they'd stand out decently being slightly oversized.


Talons and beaks

Funnily enough the yellow-orange talons and beaks for the falcons I left for later, until the paintjob was dry. Then I simply forgot them, until I finally did them at a randomly chosen moment.

25.5.22

Cockpit canopies for the default Star

At least they stand out

I had just painted the Elemental fireballs, and I liked the RLM23 shade. Without pondering too much I painted all the 'Mech cockpit viewport glass panes (yes, I knew they weren't glass for real) red. At some point in history I had painted them all flat black, but as I did one of my repainting rounds I had tried red as it was somewhat opposite to green in the colour wheel.

While working with red I also painted each laser gun tip I recognized as well (independend on the S/M/L size of the laser) just to make them stand out a bit.


18.5.22

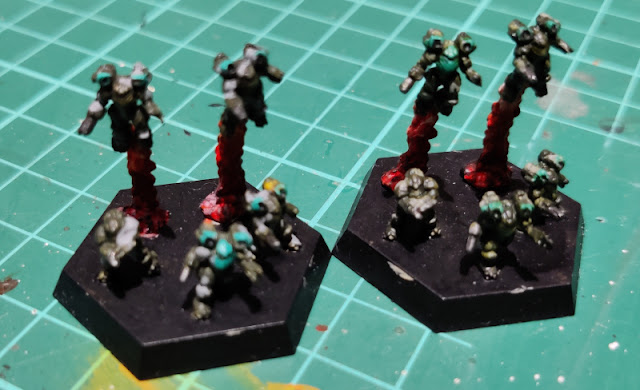
Jump effect for the default Star Elementals

Rocket power

Habits made me want to call the Elemental chemical rockets as Jump Jets. In this post I was going to refer to them as Jump Packs.

First time looking at the CGL's Elemental Point I was wondering that in the Empire was I going to do with those bubbly effects? I didn't know how to paint a fiery effect, I had never even tried. Well, now was the time to give it a shot.

Blending

Pretty much all I knew was that we'd be following Bob Ross' "wet on wet" approach instead of drying layers all the time. I ducked a few articles or posts to read about the rocket- or missile effects and build my own mental model on how that'd be used.

My simple plan was to start with a full red, then lighten it up via orange and yellow towards almost whiteness. Perhaps to the bottom, on the cooler parts of the pyro cloud, some blackness, even. Onwards to the test bench!

Red base

Just because this was the first attempt ever I started cautiously with one jump plume. I painted it red (VMA 71003 Red RLM23). As I hadn't had the time (or presence of mind) to buy any retarder for airbrushing, I did this very quickly so that the paint woulnd't dry too before its time.

Introducing yellow

Right after I added some yellow (VMA 71002 Medium Yellow) onto my palettelike thing. I mixed some with the red to get a colour something like red-off-towards-orange. I applied this to areas where it looked like it belonged, then added some more yellow into my mix to build up the brightness and slowly made smaller and smaller changes on the surface, continuously moving toward the rockets.

Same for the second jumper

The first Elemental Warrior looked pretty neat at this point, so I followed a similar approach for the second person's jump effect. They didn't end up being equal, but the effect seemed to work decently and that was my goal.

The second Point

Yeah, I was content enough to do this for the other Point as well. First the quick red basecoats.

Again, while playing with ever-yellowing paint I didn't dare to take photography breaks. So this is how it looked like a few shades later.

My jumping quartet was pretty impressive as they were, even though the hex base looked foul and ruined some of the effect.

White highlighting

As usual, I got carried away with the madness and decided to take this even further. I had been, in my estimate (and based on visual inspection) quick enough to mix in some white (VMA 71001 White) just where the rocket nozzles were, to the very top parts of the fireballs. In the photo the rightmost Point had gotten the white treatment, for A/B testing purposes. Of course.

Grey and black for different Points

The rightmost Point's billowing cloud of smoke, the bottom part, was something where I thought I'd try some grey (to make it look more smoky). I applied some light grey (VMA 71050 Light Grey), it wasn't as neat and effect as what I had had in my mind.

On the left Point I used black (VMA 71057 Black) to show the cooling down of the outer, oldest edges of the fireball created by the chemical rockets. This worked better than grey, ok for a first attempt.

Reblackened hex bases

Because my hex bases looked more like modern art or space rock album's cover, I painted them flat black. Now a viewer's eyes could actually grab a hold of the miniatures themselves.


11.5.22

Metals for the default Star

Gunmetal!

All the metallic parts got a layer of gunmetal (VMA 71072 Gunmetal), as Steel and Chrome felt a bit too bright for my purposes. Of course all of this would get washed later on, but gunmetal's been reliable choice. Nomen est omen.

Timber Wolf

The classic 'Mech was simple: the tips of the lasers in the arm-mounted pods and the torso, and maybe as a bit of a surprise: this time the LRM20 launcher faces too. I didn't feel like going through the joints and such, so on this unit those remained "normally" painted.


Nova

Twelve medium lasers in the hands. If that wasn't the top of the line alpha striking stuff, I didn't want to know what wasn't.


Executioner

So far so simple, Executioner's LLasers and the Gauss cannon were pretty boringly simple to paint. Not that the model itself inspired me to greatness. Maybe the humanoid shape was one big reason?


Adder

Adder's two TC-linked ER PPCs and the mandatory flamer didn't take much paint, especially as I didn't think the flamer was clearly modeled. At least it didn't jump into my eyes.


Grendel

Yeah, Grendel offered some more fun painting moments, I gave the RT SSRM6 the same treatment as Timber Wolf's LRM racks, the ER Lasers in the arms I painted as I felt like. Somehow the RA ERLL made me feel more like it was an AC, but who was I to tell the designers what was good and what not.


Elementals

My Elementals only got their right arm flashlights and the claws of the left arm painted metallic. The champions of Power Armor didn't ask for much.