A basic Dunkelgelb base
Before starting I covered the already painted topside with a healthy amount of masking tape and blasted the outside of the Panzerwanne with dark yellow, and fixed the subpar paintjob on the front- and rear glacis plates. At this point I didn't spend much time on the road arms, as I was going to retouch them before installing the road wheels*.
*) I've been suspiciously quiet about them for ages
I also covered the rest of the turret's outer shell, finished up the upper hull's shadowed areas and finally did something on the idler wheels and drive sprockets. These photos ended up missing the road wheels that I now painted from each side, once. Speaking of the road wheels I read that in the early production runs they had rubber rims, later they were steel-rimmed. In my project I was leaning towards steely road wheels, to get some variety in my builds, if nothing else.
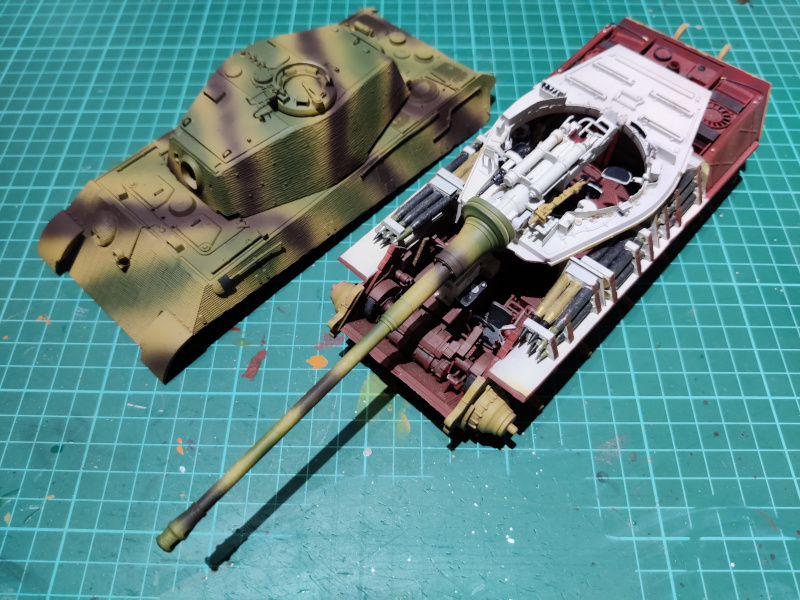
The turret's inner ring was at this point still largely untouched, as the photo showed. I thought that I'd fix it so that on the inside it'd be white and on the outside red-brown. Its teeth would get a bit of metallic drybrushing and as my oily liquid was ruined, I'd use a black or most likely a brown wash.
Set aside the differences between these cat pieces was astonishing. Based on my ammorackless dry-fittings the turret's shell fit tolerably on its base and with only a bit of force used. The only large problem so far was the tank's upper hull that didn't settle on the lower hull at all without threatening to break something.
I wasn't going to paint the engineer tools until the camo was done, here I had wanted to check how the intended look would work on the shovel. The bare metal part I painted with the metallic black instead of gunmetal or plain steel, as in my mind the darker base colour would work better on a camouflaged tank, as opposed to a shiny clean one.
The rest of the three-tone camo
Since I changed my airbrush bits from Super Fine to Fine, I thought that I wouldn't try to make a very detailed pattern without masking. On the other hand I didn't feel like having a sharp-edged pattern this time, either, so redoing one of those was going to wait for another tank.
My fresh camo paint set had a couple of options for the colours. In addition to the Panzergrau there were two different greens, browns and a sand/ivory to be used instead of the omnipresent Dunkelgelb. The dark yellow had been chosen ages ago, of the browns I chose the armour brown and from the greens I went with the olive green.
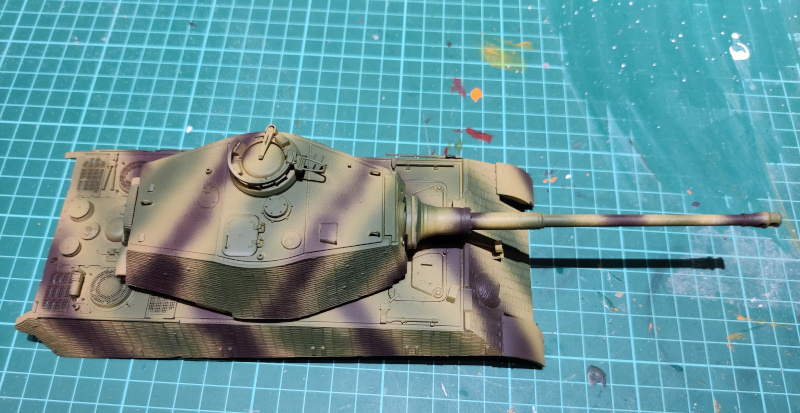
Anyone could tell that I have never been an artist, so I went for something pretty simple. I painted more or less equidistant stripes of green (VMA 71092 Medium Olive) across the hull, the turret and the gun barrel. Between the greens I painted, using circular motion, similar-shaped brown (VMA 71041 Armour Brown) stripes while leaving variying-width dark yellow spaces between every block.
On the Royal Tiger's hull I painted the front glacis plates and the rear armour plate, while leaving the bottom and the armoured tub's lower sides untouched. I didn't even want to get a uniform, continuous pattern between the upper hull, turret and the barrel. On the road wheels I tried to break the round forms with some haphazard brown and green sectors, stripes and blobs. A couple of the road wheels I even left dark yellow for variety. Of course I left (read: I forgot) the drive sprockets and the idler wheels untouched, so I had to return to them still.

Later I was looking at the deck and thought that a small fine-tuning session might be needed. A very small extra brown stripelet could find a nice living space in the rear, just like in the left front. Maybe the first two frontmost brown stripes (the one that crosses the radio operator's machine gun and the one that went across the turret's opening) could use a bit of deshaping - they looked a bit too uniform and solid. Also a couple of the dark yellow bands were quite narrow and low on intensity.
My turret with its barrel looked pretty neat already, even if I only took a photo to show the right side only. The pattern didn't need any changes at all, a bit of touching up if anything.
All in all the whole upper hull was pretty good. Doing the fixes I was pondering a couple of paragraphs earlier didn't bother me at all, but not doing them wouldn't ruin the tank either. Still I knew myself and that if I didn't fix the things that I knew no one would pay attention to, they would bother me until I had to fix them at some point anyway.
Yay, my camo pattern was pretty much done in one go, which was quite baffling if you thought how much tweaking, reworking and multistage-painting this model had required so far. After my fixes I'd apply a wash and then do some edge highlighting.
Some fixing
I was very content with the camo pattern, after another day I couldn't fing much to tweak. I strenghtened a couple of the less-covered bits where the brown or green didn't cover as much of the dark yellow basecoat as they should've. There were a few places, both on the hull and on the turret.
On the hull I modified the stripes I had complain-commented about earlier. Now the first two brown stripes were less arrow-straight and uniform in their respective widths. Around the second line I also reinforced the dark yellows, as they had ended up a bit too narrow for my liking. To break the third main brown stripe I added a tiny sliver of dark yellow to break the widest brown patch.
Now that I remembered, I added some camo effects on the final wheelsprockets. I followed the same nonexistent plan as with the road wheels: don't make them exact copies of each other.
Final touches
Slightly off-topic I noticed that the outer edges of the turret's base had ended up white. I painted them with the red-brown to follow my approach from the lower hull. Now it felt that my eyes got a better hold of the part, as the essential bits were properly colour-coded.


No comments:
Post a Comment