SdKfz 161/1 - Panzer IV 7,5 cm KwK 40 (L/48)
"The tracks rattle, the engine roars, the Panzers are rolling in Africa" sang the Sauerkraut-enthusiasts, according to my purposeful mangling of the lyrics, while the fortunes of war were somehow on their side. This DAK Panzer IV Ausf. F2 had eaten most of the summertime, and got done surprisingly quickly despite this last schoolyear being an example of the infamous and untranslateable ruuhkavuodet [fi]. I poked my model whenever I had the time for it, and enjoyed my time.

Border Model
I had talked about the bits and instructions while I was on the build, but I thought it was a decent idea to type up some conclusions as the maker was a new one to me. Like I said in the first post, I grabbed this from a local hobby store, Tieto-Nikkari, after a good chitchat with the dudes working there.
The instructions were basically fine, some of the pics just were a bit unclear on what in the Empire was to be done. Not that I hadn't complained about this same thing on some other manufacturer's instructions, either, so this was not that unusual. One of the examples of these "say what?" moments was the turret upper front corner -located hooks: the how to build image didn't really clarify a thing, but an image a few steps later showed the completed thing that showed clearly what I was expecting to see.
Another source of grumbling was related to the optional pieces. There was a huge amount of different bits, and this was exactly what the instructions were the least clear on. Or maybe this kit was aimed for those who lived and breathed these details. I clearly wasn't one of those, so I ended up with the set of optionals that came up first in the instructions. The only extras that I actively decided to leave out were the track links, as I didn't want to mix up the kit's own and the Panzerwerk Design's track links, and some of the side track armour pieces had T-34 links and I didn't expect to find them in numbers in North Africa.
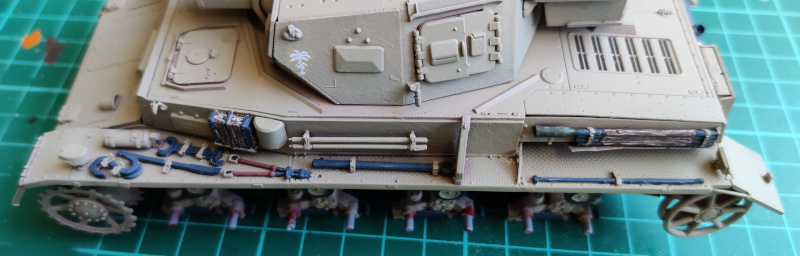
Just about all of the pieces needed an amount of cleanup (and the photos showed how I failed here and there, even if my own eyes and fingers told me I had gotten the irregularities out), some more than some others. Mostly the mold lines were handily positioned and the fitting of pieces was absoutely great. I did the amount of dry-fitting I did out of my own paranoia.
The pieces also looked fantastic, I had repeatedly admired how nice-looking and detailed they were. Then again, I wasn't widely known for my golden ears or impressive expertise, so you should take this praise with a grain or two of salt.
In case I encountered another interesting kit by Border Model, I could foresee myself grabbing it with me without much pondering. This one was very nice, thumbs up.
Panzerwerk design
These were the second third-party tracks I used, my previous experience was from just a moment ago, early 2000s (while working on the King Tiger two years ago I thought it was about 17 years ago, so...) when I played with Friulmodel's ATL-22 tracks.
3d printed tracks, at least in this one instance, were nice and quick to assemble as soon as I had found a workflow that worked for me. The tracks ate paint well, and painting didn't negatively affect their movements. In all honesty I was pretty damn excited about them all the time and I certainly would order more of their tracks to a yet unbought tracked vehicle.


Method testing n+1
Modifying the smooth plastic pieces to be more steel-like by using glue to soften the plastic up did just what Uncle Night Shift promised. The surface looked much better. In this model I also tried the next step further with the glue-thinned putty, but my implementation suffered from the putty I used. I would have to try this one out again with a different product.

I didn't keep that much track of how much of a difference the better and worse puttied surfaces, and the ones that had just the stippling done on them. With the orange skin effect on some parts was a clear issue and my putty-glue goo was too thick and dry when applying. Later I bought some Tamiya putty, but that would be tried with a new model.
Painting
Being boring was a risk with a monocolour desert yellow sceme, just like with a plain 4BO vehicle. Tools alone weren't going to bring enough variety, so the oils had an incredibly large effect on how the model ended up being. Another thing I had never done before was the highlighting of raised bits after a wash, but this time I foreached boltheads and upper edges. Maybe I had expected the result to become a bit too cartoonish or WH40k-ish, but my assumptions were incorrect.
Unlike my previous single-colour tank, I hadn't thought of making this one badly mistreated or weather-beaten, so the chipping wasn't as big an item in my variety-increasing toolbox this time. Of course I added a few, but a few indeed and in my opinion onto key places. Oil washes and, to a lesser extent, the sand pigments carried the heaviest burden.
Unwashed:
Thoroughly oiled:

Of course there were many stages between these two photos, in addition to the photos being taken under very different lighting conditions, different cameras (phone vs a DSLR) and whatnot. I hoped it was enough to show the difference.
Time usage
Thanks to the hecticness of everyday life I mentioned earlier I got lost with my timekeeping from the get go, both with my documentation and naming of photos. So I had no clue of what kind of time I had spent to be even remotely accurate. Most of my modeling sessions lasted 30-45 mins, so an average of 40 mins per crafting session shouldn't be too far detached from reality. The 270 WIP photos I had somehow divided into nicely round 16 groups, which would translate into something like 11 hours, but I was pretty certain this wasn't quite that rapid.
A handful of hours could be pretty safely dropped on top of the guesstimate and assume that bit more than two full workdays could be a decent timeframe for this tank. Of course the defragmentation of my time usage was suboptimal, as setup and teardown procedures ate an unreasonable chunk of time, and it was worse the less I got actually done. As we all very well knew, context switching was damn expensive.
Imagery
So here we were. Another new manufacturer has been tried out, a new paint scheme, and a detailing method. The strange thing was that I was suspiciously content with my doings yet again, and that was strange indeed. At least the photos left plenty of space for improvement, so I wasn't in the immediate danger of becoming totally delusional.


Next time we'd be again in the environments of the year 3050. But war. War never changes.
No comments:
Post a Comment