Mastodon

10.2.16

Fixing and painting details

Patching

The last time I nailed the camo pattern, so now I proceeded to do some touching up. A couple of funnily painted areas on the wings I fixed with a dab of green (VMA 096 Panzer Olive Green), some darker patches on the airframe I touched up with the other green (VMA 71124 USAF Green) and that was it. Next I painted the fronts of the engines grey (VMA 71123 USAF Dark Grey), because it felt like the prettiest choice.


Detailing

All the landing gear bays, their doors and the landing gear themselves I painted white (VMA 71001 White), as the instructions told me to do. While I remembered, I also painted the pilot's ladder's container and the inside of its door as well. At this point I didn't dabble with any door art and I don't know if I ever will. Maybe I should, but we'll see later, much later.


While I was working on the ladder, I painted the topmost part and all the steps yellow (VMA 71002 Medium Yellow) and all of the telescope-parts metallic (VMC 70865 Oily Steel). Embracing the KISS approach I used that same metallic paint on rear parts of the engines and some tubes in the landing gear, maybe even properly.


Greenifying

Right now I felt that the main job was done. I then washed the plane green (VMW 76512 Dark Green for green vehicles) and I felt that this was a good choice. For a change I had not forgotten the wingtip lights and painted them after the wash had dried, as I had planned. One of the lights was, as is customary, red (VMA 71085 Ferrari Red) and the other was surprisingly blue (VMA 71111 UK Mediterranean Blue), not green.


3.2.16

Hogging the airbrush

European 1

After slacking off for a considerable time I finally got myself at a table with my paints, airbrush and the compressor. This time choosing the paints was an easy operation, for some reason I had just chosen the earlier avoided European 1 ("Charcoal and lizard") pattern. While checking up my sources I had just written a note for myself saying ""Euro1: dark green; light[er] green; d-grey" and with that in hand I started going through my bottles.

To accompany the grey primer I had dug out some grey (VMA 71123 USAF Dark Grey), green (VMA 71124 USAF Green) and some other green (VMA 096 Panzer Olive Green). From the different options available these pleased my eyes the most. After that was done I took one last look at a couple of sample photos on the computer and went to my painting station.

To work

On top of the primer I airbrushed a proper layer of the lighter of greens, over and under. This'd be the base on which I'd build the rest of the weird pattern.


Without further ado I loaded my Badger with the darker of the greens and tried to build up a pattern that somehow worked for me. As is well and widely known, I don't really give a rat's arse about real life examples, individual photos or anything but instead freehand these things.

Of course I didn't remember to take a photo of this intermediate step but I guess that wasn't a cardinal mistake. As soon as that was done I added grey into the paint container and touched up some tactically chosen spots on my model.


In case you, dear reader, notice something being a bit off, you aren't alone. I noticed that myself while checking the photos. Yes, the rear wing setup is slightly tilted, thanks to the bad fit and the filing it required. Life is hard and the plane is twisted, can't do a thing about it now, as I'm no way going to tear it off and potentially destroying the whole construction.

The freshest status of the project can be seen below. I don't think the pattern ended up looking too shabby. A purist might of course yelp, especially as I intend to use whatever weapons I happen to feel like using, not caring if they were even a daydream in their designer's minds when E1 pattern was in use :)


27.1.16

Oink oink

Processing the canopy

At this point of the project I took care of the cockpit's canopy. This general approach is most definitely not invented by me, I just got it from a youtube video and after a couple of tries I've decided it works very nicely. First I painted the inner frames dark grey (VMA 71052 German Grey) and while I was at it I applied that same paint over the cockpit itself. This painting step is not from that aforementioned video, but something I've noticed to be a handy thing to do before anything else.


As soon as the paint had dried I covered the canopy bits with masking tape so that everything was guaranteedly covered. I pressed the tape tightly into the edges of the pieces and got rid of the bubbles. At this point you could tell that the inner frames showed handily through the masking tape.


Following the clearly marked edges I made sharp cuts with my xacto knife so that I could just pull the excess tape bits off. The result was a clearly and nicely masked pair of transparent pieces with all the protectable areas protected and the rest covered. Just the way they were supposed to be.


Before I glued the canopy parts on I glued the aiming glass on the dashboard. As you can see in the photo I had slightly overused the white glue, but maybe we'll survive as that stuff dries transparent. And I didn't go that far overboard, anyway.


Sealing the plane

To wrap this session up I started shutting the cockpit up. Firstly I applied some white glue on all the edges of the main canopy part and pressed it into its place. The bugger was grinning a bit on the rear, so I used a bit of masking tape to keep up the pressure. After that I whiteglued the edges of the windshield part and dropped it in place.

The few excess white glue droplets that were sprouting from the connections I just swiped with my fingers along the edges, to seal the connections a bit more. I was pretty trusting in this setup of mine being as paint-tight as it has been so far, so that my plane's cockpit would be safe from any airbrush-related mishaps.


Finishing the bottom

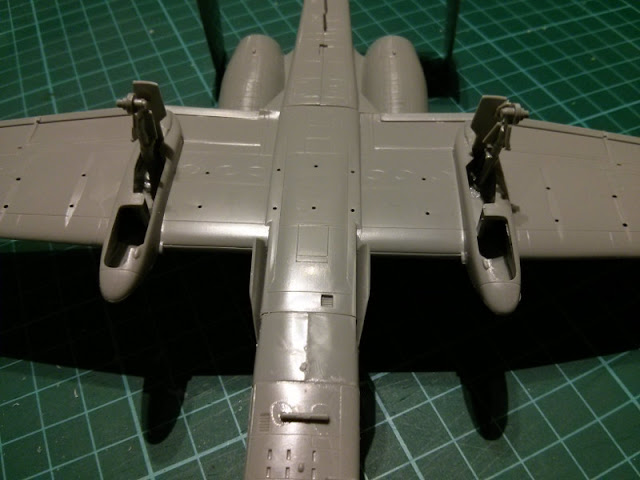
There wasn't much to build at this point anymore. I quickly assembled the main landing gear and glued both struts into their tubs with the bay doors. Those tiny door pieces were a bit fiddly-looking but in the end they did stay put.


For a very bried moment I thought if I should actually leave the struts off while I painted, but as I had already glued in the front one, leaving these didn't really make any sense anymore. I guess that if I continued working on these flying things for eight more models, I might eventually remember what was the optimal approacch to these things.  Or not. At least doing things this way I could leave the model standing on its stubs while I paint the upper surfaces.

Getting to the meat of this business

Everyone's been eagerly waiting for this moment, I bet. I again installed a disturbing amount of pylons on the Hog's hardpoints. This time they'd be so overloaded that you couldn't fit anything else in anymore.


While writing this post I was thinking that there was at least a six-bomb containing rack for some very funny things. But we'll leave the loadout planning for later, as we'll be painting the Hog a bit next time!

20.1.16

Getting the Hog started

Quick start

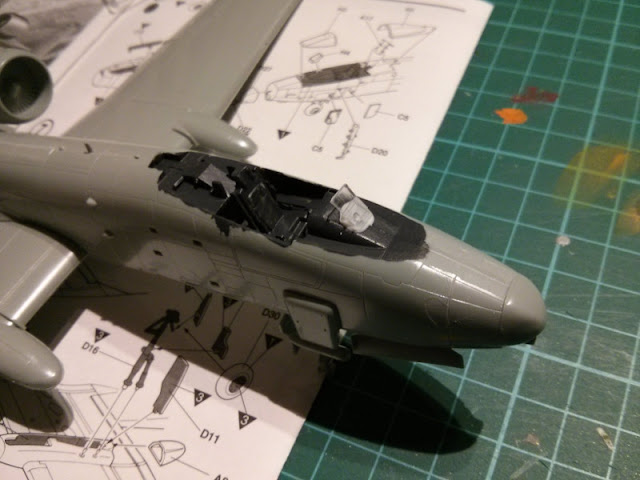
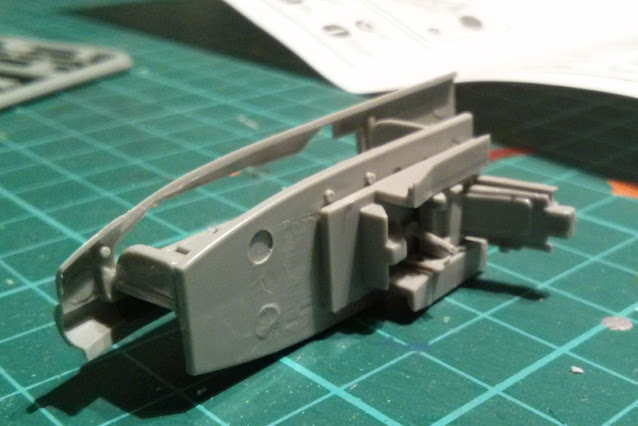
Without further ado I built the pilot's area first. It consisted of a three-piece ejection seat (which was a surprise!), glued that one on the base and added the stick. I'd done more for this area if I had a pilot figure to go with it.

While I was working I glued this subassembly into the rest of the frontal structure. The guideline, somewhat surprisingly, told to include some ballast around the front landing gear well. Of course I didn't own anything like that (anymore), so I dug out some surplus metal bits from a furniture shop. And then I used white glue to stick them in place, as seen in fig. 3.


The next evening, when the screw/bolt pair was tightly set, I entombed that unit inside the two-piece airframe. Then I glued the wings together. Those were grinning pretty evilly, so I taped them tightly together to avoid any idiotic behaviour from them later on. With that issue taken care of I quickly built the engines.


I guess they'll need some touching up here and there. To get them settle in their place on top of the plane I had to file quite a bit. The wings themselves also required some slight violence before they obeyed me. Maybe this'd be a good thing in the end, having the joins made so very tightly.


I remember getting some feedback (on the Finnish side at least) regarding the rear stabilizers being in wrong angles on the N/AW model, so I paid quite a bit of attention in getting them guaranteedly straight. Though that's what I had done the last time, but now I triple-checked. Of course one can't see it that easily in photos like this, but they were straight.


Some surprising details

When I turned my attention back to the cockpit department I noticed something exceptional. Behind the ejection seat a funny piece was to be added, that I recognized, after a bit of fiddling (playing around, that is) as the piece that moves the canopy. I did raise and lower it and try it with the canopy part and damn, that was a great little piece!

If I was an eager airplane modeler and especially if I had a pilot to add here, I'd most definitely left this canopy open or ajar. Anything but closed up, anyway. Wonderful detail, this one, and I really didn't expect to find something like this on a 1/72 scale kite.


As was to be expected, I left this marvellous detail unused and glued it shut. I also slapped the nose cone on, but left the Avenger's end apart on purpose. I just wanted to make sure I'd get to tinker with it in piece, in case I wanted to improve it somehow.

Being finished with what I was going to do to the cockpit I turned my gaze at the front landing gear and quickly built and installed it. The front wheel (actually all three of them) I again decided not to install at this point, for my own convenience. They'd only be on the way until the paintjob was done, this'd be that much easier.


The nose area also received the Pave Penny pod and after gluing it on I took a new look at the instructions. Now I noticed another very cool surprise: the extending ladder. I remember looking at the photos in the references and marveled at the automatically (gravity-powered) extending ladder setup and had pondered on how awesome it would be to have that on a model standing on the grond.

Well, here I had it as an option and of course I glued it in immediately, with its door open. In hindsight I maybe should've done that ladder installation after the main paintjob, but it was too late now.


13.1.16

Project I/16

Fairchild Republic A-10 Thunderbolt II

It was nice to return from the Galaxy Far Far Away back to the feelings of the cold war. The Warthog's box art was yapping something about the freedom in Iraq but we'll ignore silly propaganda. Here in 'mumblings we stick to the strictest truth and coldest facts. Unless we're pulling everything from our magical hat, of course.


Guidelines

The instructions went back to the N/AW-style short and to the point kind of no-nonsense instructions, as a pretty noticeable change from the Raptor's more verbose multi-step process. I guess it was to be expected, as the planes are so very different from each other.

I didn't waste time in looking at the instructions more than with a general "yeah, this''ll be another three-step build" and flipped to the painting and markings side. The camo pattern wasn't something I had thought of yet, so I cannot yet say if I'd take this one offered or if I'd pick up something else from my references. At least the decals were marked here in the usual fashion, so it won't be totally useless.


Bits and pieces

Nothing in the sprues jumped out initially. While I was looking at the decal sheet I was pondering if I'd paint it myself or subject myself to the potential problems and less-cool approach of applying it as a decal. The canopy was a two-piecer, nothing new there. Some wings, engine parts and all that, typical and normal.

Then I noticed something completely and utterly unexpected. One sprue had some weird winged cones (the first thing I thought was "are those Mavericks or what?" and surprisingly google verified my guess). Immediately I realized that two other sprues had bombs/missiles in them. Also a good amount of hardpoints and pylons were found, I just didn't think of looking more closely at the pylons.

This'd end up an insane warmonger, especially with the repeatedly mentioned A2G box filled with all things interesting. If nothing else, I'd load this beast up so full that it wouldn't even make any sense anymore! Buahahhaahhahahahaaa!


12.1.16

The Force has been awakened

What else would you do with your plus hours from work if not to go to the movies in the middle of the day? This way we didn't need to worry about who looks after the project assistant or anything of the sort. Oh, and for a change I got to use some of those hours to do something fun instead of taking care of some business or another.


The Force Awakens

Spoilerlessness

I hadn't specially avoided the spoilers but I also didn't seek them. Avoiding absolutely everything (re: my approach to RotS) is something I didn't feel like attempting, especially as my assumption was that we wouldn't see the movie before it got released on dvd. Surprisingly only a couple of headlines got through anyway (both were about Kylo Ren's family relationships), but who cares?

At some early point I did read some very, very odd speculations that I encountered here and there. Their sources were either attention-seeking fakes or otherwise idiotic, as the "spoilers" or "rumours" were so very braindead. I guess that's the reason I didn't bother with the spoilers. I got fed up with these unknown idiots fooling around and just ignored them.

The movie experience

Sadly there were only those repeatedly cursed 3d versions on in places we'd get to easily at tolerable times. My everyday life is already three-dimensional so I'm more than happy to watch moving pictures on flat surfaces. Especially as the normal movies don't require ill-fitting, annoying and inconvenient plastic frames to be worn - and the image looks natural. Or at least I find the 3d effect always either very cardboard-y and all the "hey, it's in 3d!" moments look so very purposefully set (roller coasters, throwing stuff at the viewer, the nose of a space cruiser coming out of the screen).

In very short: I liked the movie. As usual, there were things to mumble about, but nothing really serious. I'll start with the cons so that's done then.

-

Underlining events with music. I really can't stand how certain references to the OT just couldn't be left on the screen but there had to be a tune from the OT, a tune that didn't fit the rest of the soundtrack at all.

The music was totally unmemorable, excluding the theme and the aforementioned short bits. I keep assuming that there was something on the background all the time... I guess,

There may have been more parallels to the OT (or ANH) than what the minimum requirements demanded. One thing that especially caught me off guard was the Starkiller Base (I was wondering if they had mixed some stuff from the EU just for the fun of it (Suncrusher + something else), as a nod to those of us who meddled with the books as well?). Then again, I don't think my reaction would've been much different in any other case, as the Empire had more superweapons than the Germans in the Commando comics, so it'd been a bit of a challenge to come up with something totally new and original ;)

+

TIE fighters with their howling. Also, you can call me mad but I think they also referred to the awesome TIE Fighter game (Mag Pulse missiles, avoiding the concussion missiles ...), the troop transports / assault transports had been slightly updated over the years, I guess.

X-Troopers or Stormtroopers, the new Flametroopers and what else they had. Awesome. I also loved the combat drop that we saw in the trailer. For a change they also had !main characters as their targets so they got to hit something.

The lightsabering was also nice. Or actually it was horrible, which was great, as a nice opposite to the acrobatics of the PT's fights with the skills honed over a lifetime. You know, this "I'm gonna chop you to bits with this cool new weapon right now, damnit!" attitude.

The insurgents apparently weren't the great winners of the galactic civil war and the resulting rulers of the galaxy far, far away - very unlikely what happened in the now non-canon EU. Whatever the balance of power is between these parties (the successor of the Galactic Empire vs. the pitiful rebel band) remains a mystery, but I assume (or is this wishful thinking?) that it's more tied than not.

Very importantly the galaxy isn't as small as it has been before and what could've been expected! For a change (this being the second time in a series of seven movies) no one sets their foot on Tatooine. That alone should be worth throwing a party :p

...

I guess there's plenty more but these came to me right now and I don't really think that anyone's that interested in reading what I thought of this stuff. So I'll cut the crap now and won't even try to analyze anything, as that never works out (that is, I hate peole analyzing movies, books and whatnot)

Oh and we don't have to wait further than until the next year to see the Ep VIII? Himmel.

/fanboy